Tag Archives: hot glue

DIY: Polaroid Display

On our recent mini vacay to Delray Beach, we brought along an old polaroid camera. We had gotten it at a flea market a few years back and I never really thought it would function (I just wanted it as a funky bookshelf accessory). But lo and behold, Chet found a way to get it working and we took a roll of beach-y, vintage-vibes snaps.

I really wanted a way to display this special roll of film. Each of the pictures make me happy and I love that they look like they could have been shot in 1977. (#nofilter just an old ass camera, lol)

Here’s what I came up with and instructions in case you wanna make your own!

What you’ll need:

  • a frame
  • hot glue gun
  • glue sticks
  • thick twine or rope for hanging
  • thin twine or yarn for stringing across the frame
  • mini clothespins
  • sandpaper if your frame needs a lil distressing

And how it all comes together:

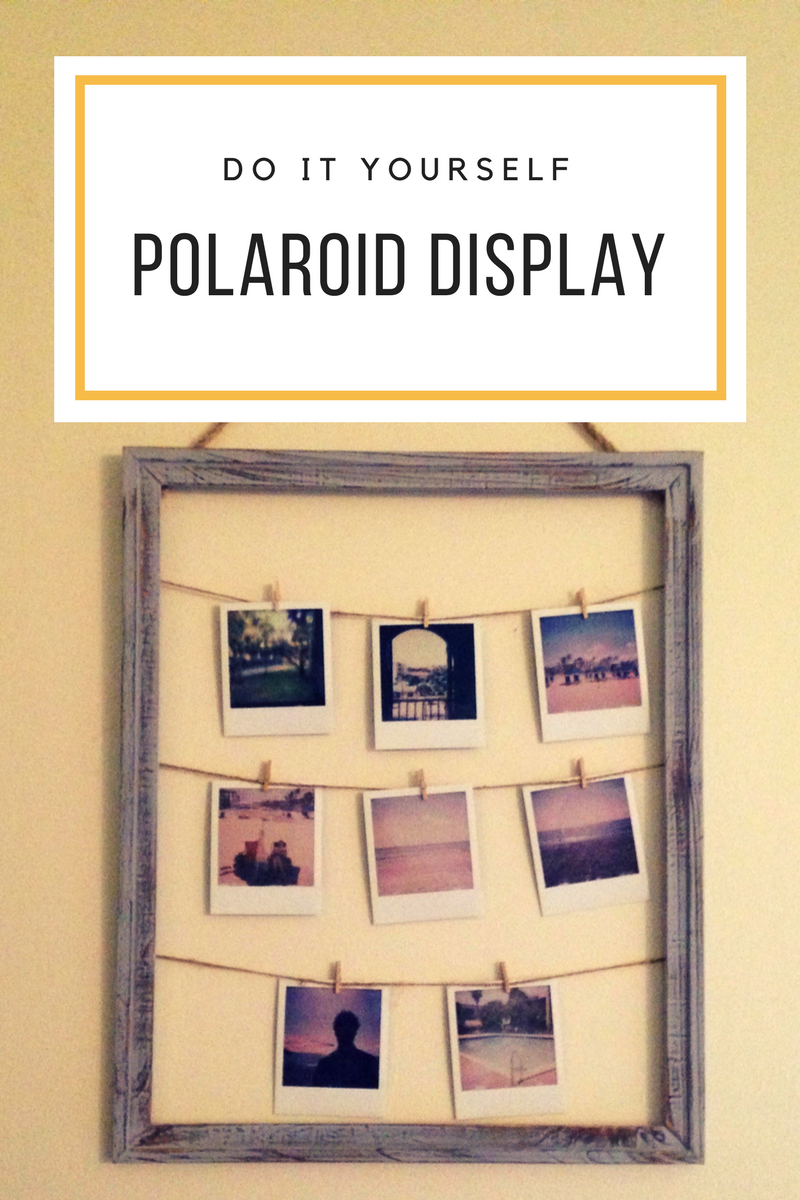
The most important part of this project, in my opinion, is to find a frame that fits the vibe of your polaroids. I found this one on clearance at Home Goods. The light blue, antiqued look really goes with our beach-y, vintage-looking polaroids. You could probably find a great frame for your own photo display at a thrift store or maybe you have one sitting around your house! If you’re going for a distressed look, you could always paint and then sand to let a little wood peak through.

Once you have your frame, take out the backing and glass. Lay out your polaroids to see what arrangement will work best. Then, measure out some twine and string it across. Secure with hot glue.

Next, cut some thick twine to attach to the top of the frame for hanging. Depending on how heavy your frame is you may need to staple down the ends.

Finally, clip your polaroids on with some adorable mini clothes pins.

Hang on the wall and admire your finished product…

I’m totally obsessed with how this turned out and love displaying our tiny collection of beachy polaroids by my desk! Have you completed any DIY projects lately? I’d love to hear about them. ❤ 

Advertisement

DIY: Cork Wreath

trash to treasure

When I was really little I told my parents I wanted to be a recycling woman when I grew up. Now, in my defense, the work I thought was involved in this profession was a lot different than how you may perceive it. I thought recycling people were given trash and then recycled it into items more useful or beautiful. Literally turning things from trash to treasure. My family had a good laugh. I pursued other career options. Life went on. Yet, I’d like to think I held on to a little bit of that childhood initiative. I still feel the need to create something out  of what was otherwise, to someone else, nothing. Maybe that would explain why for months I’d been holding on to a shopping bag full of corks at the back of my closet! An old co-worker’s cast-off…”Will anyone use these for a craft or something?” *raises hand* *ponders how long she’d been adding to this collection, the ol’ Wino!*

The itch to create something from her collection finally struck and I thought I’d show ya how to make your own! I’d eventually like to make a framed cork-board completely out of wine bottle corks but it’s gonna take a lot of nights sipping ol’ faithful (Read: Yellow Tail Chardonnay and whatever’s cheapest Malbec) before we get there. In the meantime…

What you’ll need:

IMG_0933

  • fairly sizable collection of wine bottle corks
  • styrofoam wreath form (You can get these at any craft store but I’ve also seen them for sale at lots of other places, even Dollar Tree.)
  • hot glue gun
  • glue sticks
  • ribbons, fake flowers, buttons, burlap, or anything else you’d like to attach

And how it all comes together:IMG_0939Heat up your glue gun and get to work! There’s no real science here. Just glue the corks down in whatever arrangement you fancy, making sure to leave as little open space as possible for the inside of the wreath to poke through. If there are words, design, or cool details on a cork that you want to display, affix it prominently. This can be a great way to show off a cork that may have sentimental value to you. Think: the bottle you opened on an anniversary or the souvenir wine you brought home from a trip abroad. A few of the corks I used were visibly cracked and I thought that looked cool! If you don’t, hide them near the bottom.

Note: Depending on how your wreath form looks, you may want to wrap it in fabric or burlap before gluing down the corks. Use a long piece of fabric and continuously wrap until you reach the end. Glue the first and last edge down with your hot glue gun.

Once your wreath is completely covered in corks, you may want to add a little embellishment. I dove into my craft box to see what I had on hand and came up with some burlap, ribbon scraps, an old iron on transfer and a star charm. But you can use whatever strikes your fancy!

IMG_0941

Now, hang and enjoy!

Do you like crafting with cast-offs? What’s a collection you have that could be re-purposed into something useful or beautiful? Pinterest awaits you! And speaking of Pinterest–follow me! I’m always pinning the cool up-cycle projects I find.