Category Archives: DIY

A Pocket Letter How-To

IMG_1673

Confession time. I’m a little bit addicted to going down weird rabbit holes on YouTube. I could watch people tell me about what’s in their handbags, how they prep meals for the week, and what a day in their life looks like FOR HOURS. But recently I followed a rabbit hole on a path that looked a little bit like this…

Christmas craft tutorial —> Dollar Tree Haul —> Pocket Letter “Unpocketing”

Hold the phone. Pocket Letters? Say what?!

Fast forward about an hour (in which I clicked video after video about these little mail goodies) and I was obsessed. Essentially, Pocket Letters are an adorable platform to send mail to your “pals” by way of a 3 x 3 playing card page protector. You decorate each pocket however you like and tuck little stationery goodies on the back. How. cute. is. that?!

Here’s the thing…I’ve always loved the idea of scrap-booking. Even the new trend of glam-planning looks like it would be a really fun crafting outlet. But my problem lies with the commitment. I can’t reconcile the fact that I would have to keep up with something consistently for an entire year in order to come away with an end product. Pocket Letters seemed like a cool alternative. A way to flex the same artistic muscles while also providing an excuse to send some beautiful mailbox love. I also LOVE patterned paper, stickers, washi tape, and all sorts of cute stationery supplies! (Read: I love having an excuse to buy them.)

I’ve made two Pocket Letters so far and can’t wait to make more! If you’re interested, here’s how I do it…

I purchased the page protectors on Amazon. To act as the background for each pocket, I got patterned paper from Target. Most of the videos I watched about PL’s recommended getting paper in a 6″x 6″ size because the patterns are more to scale for the size of your pockets. So I went with that advice. You can also find this sort of paper at Wal-mart, Michaels, Hobby Lobby, etc. I picked out the patterns I wanted and cut them to size for the pockets, 2 1/2″x 3 1/2″.

Next comes the fun part, decorating each pocket! I found the easiest (and quickest) way to affix all the decorative elements on to each page was to use an adhesive runner. Everything I used either came from Dollar Tree, the dollar section at Target or I already had it on hand.

Finally, a big part of PL’s is including samples of your stationery stash for your pal to enjoy. These little pieces get tucked in, along with the all-important letter, and then the Pocket Letter is ready to ship!

Wanna see more? Keep scrollin’!

IMG_1674 IMG_1684

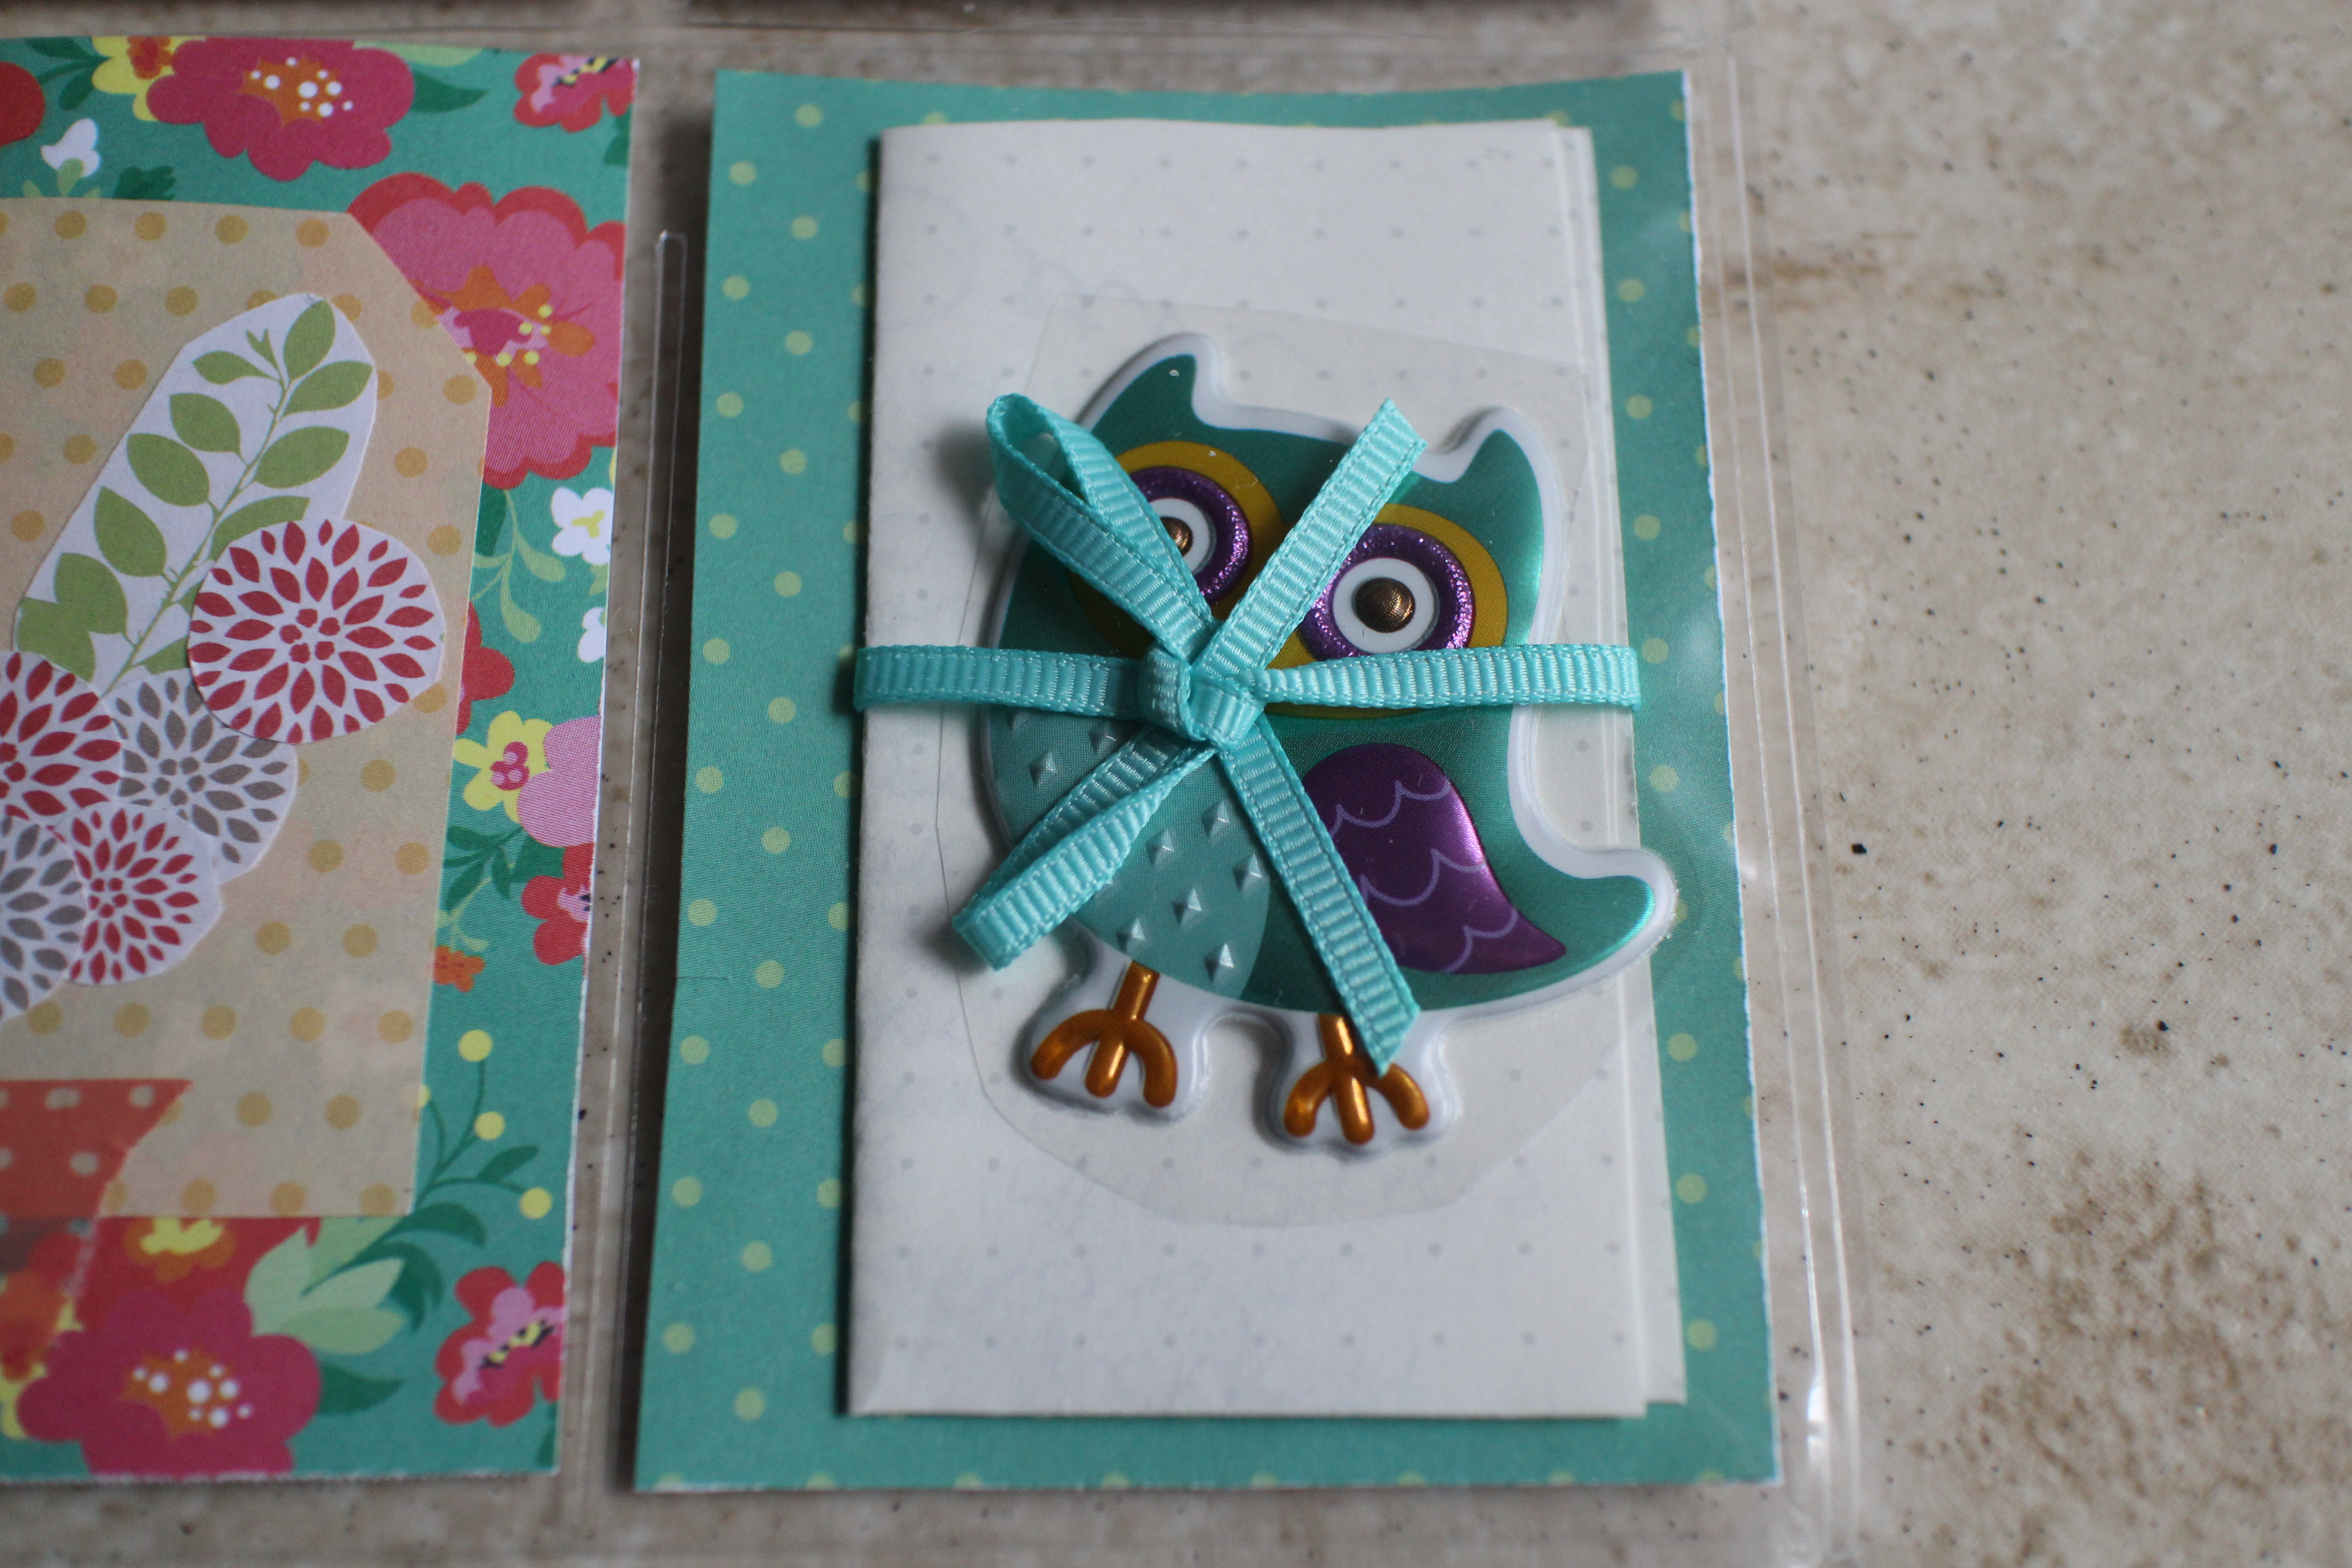
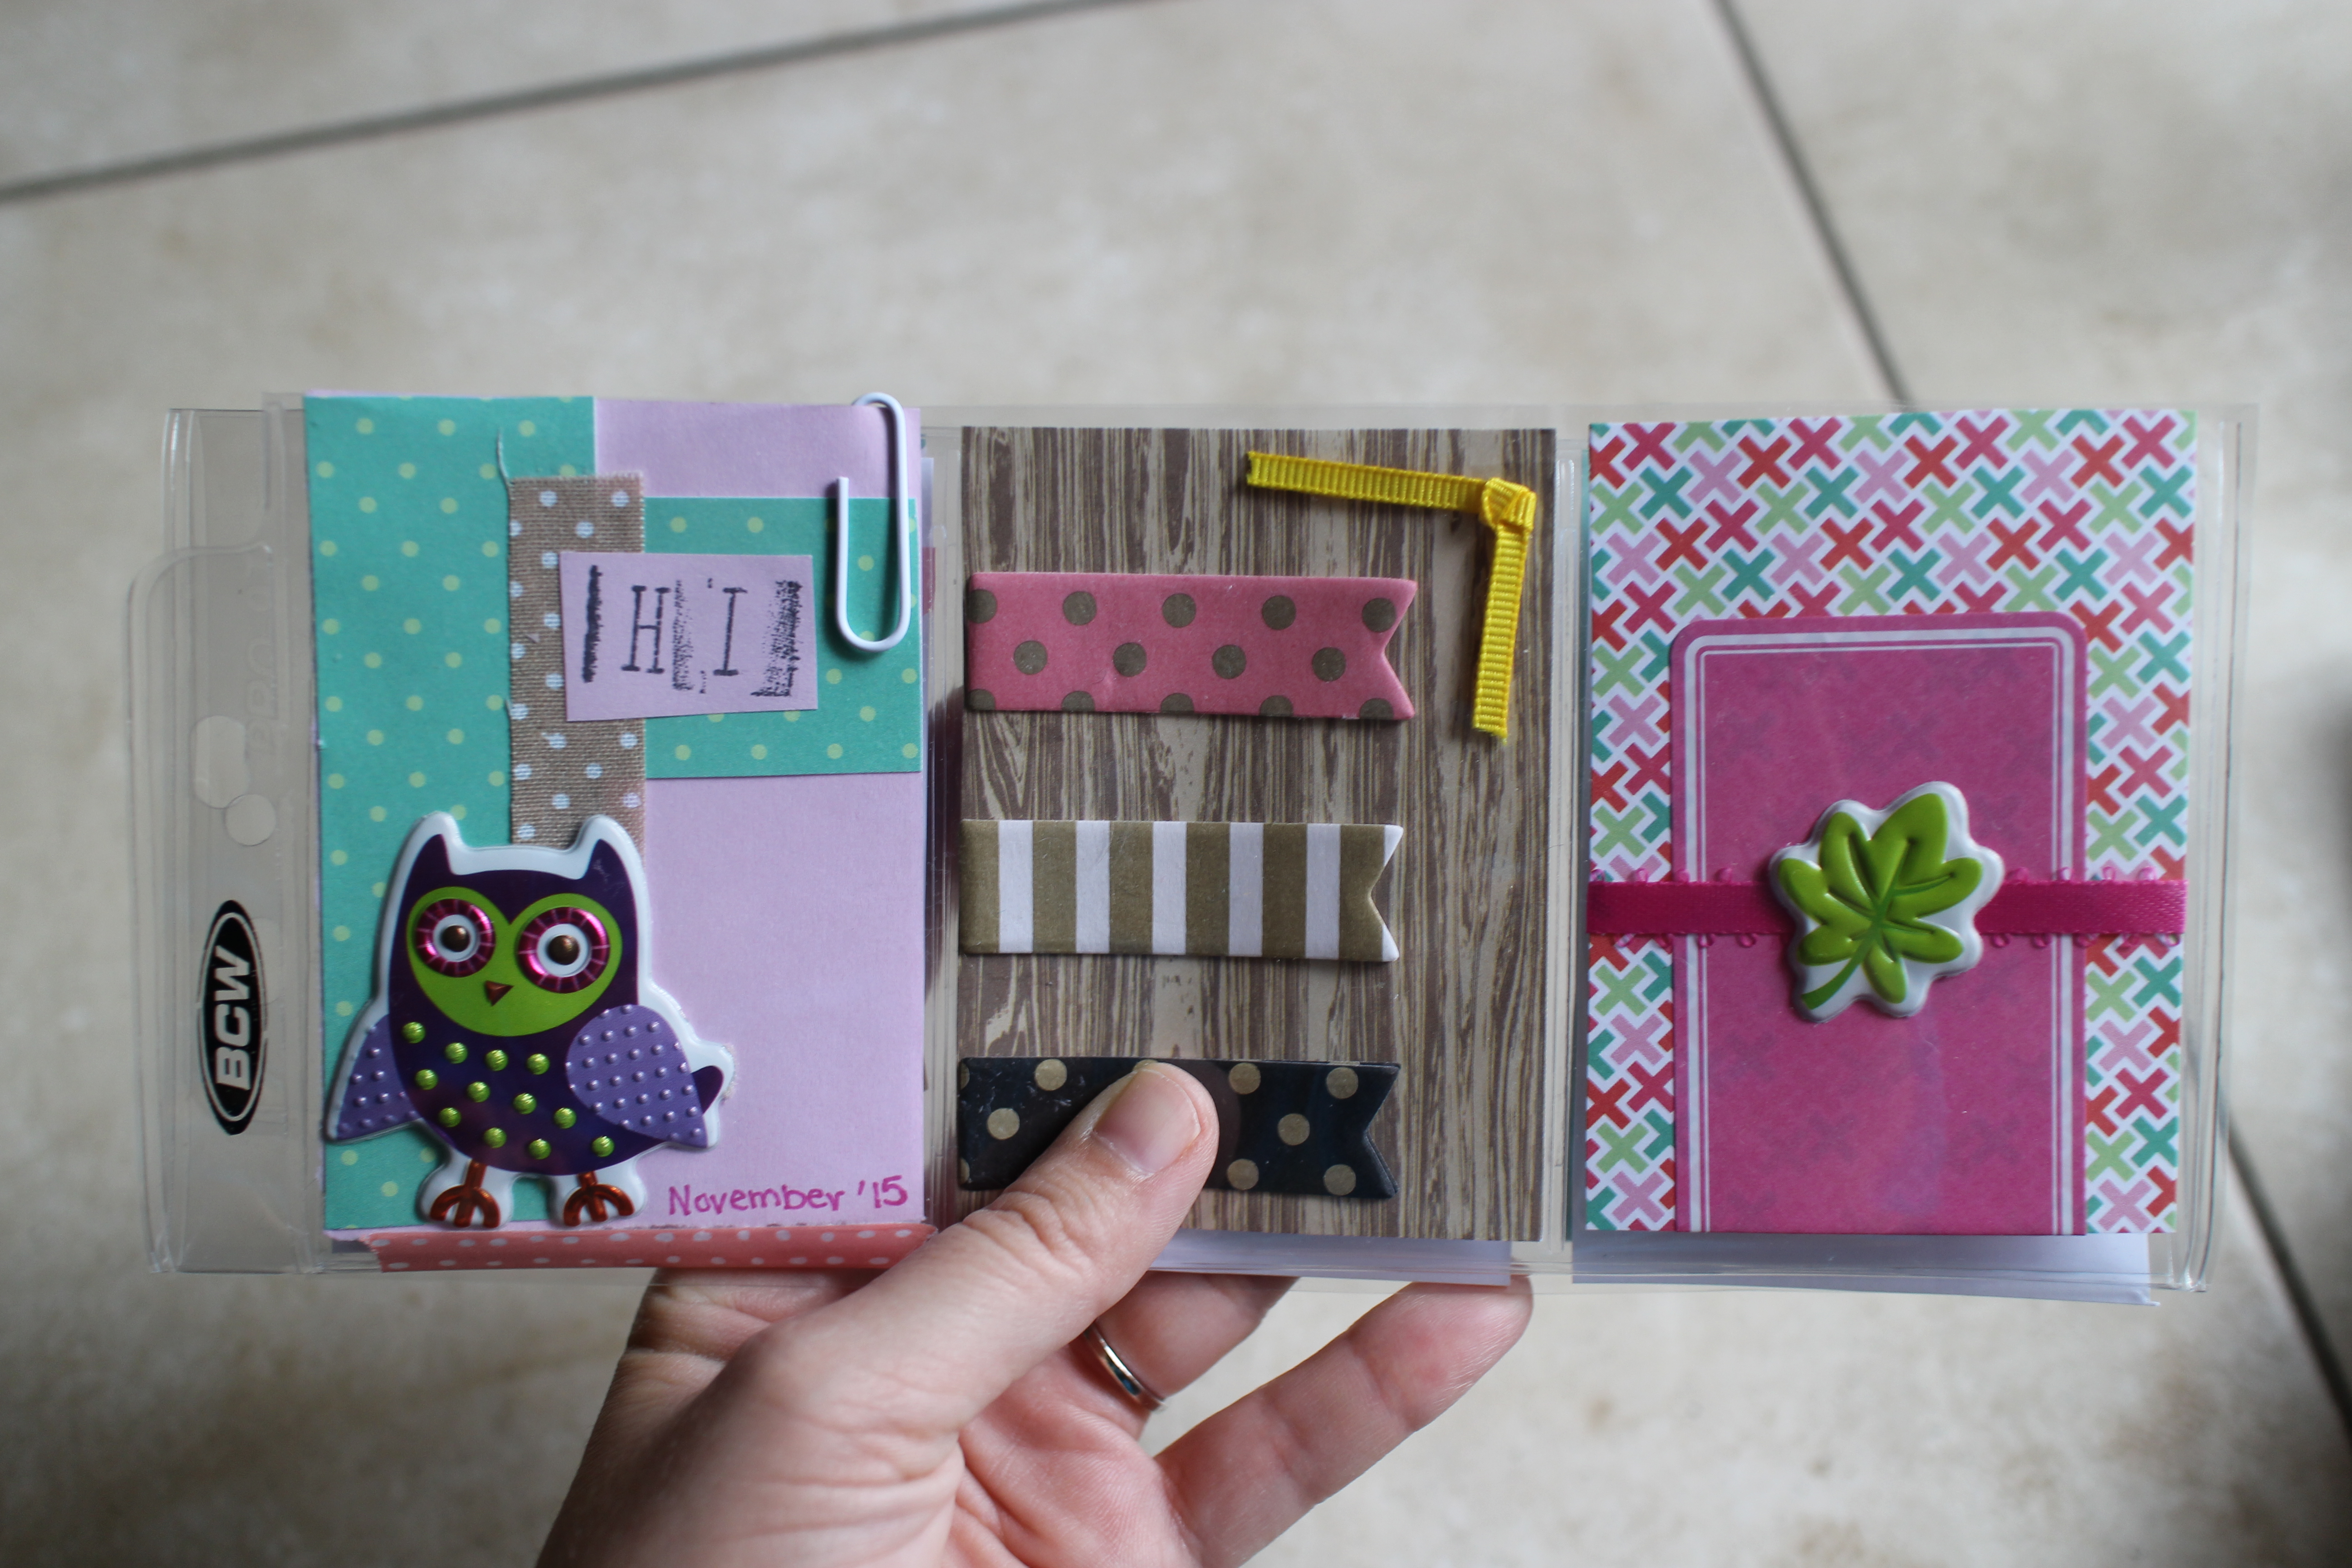
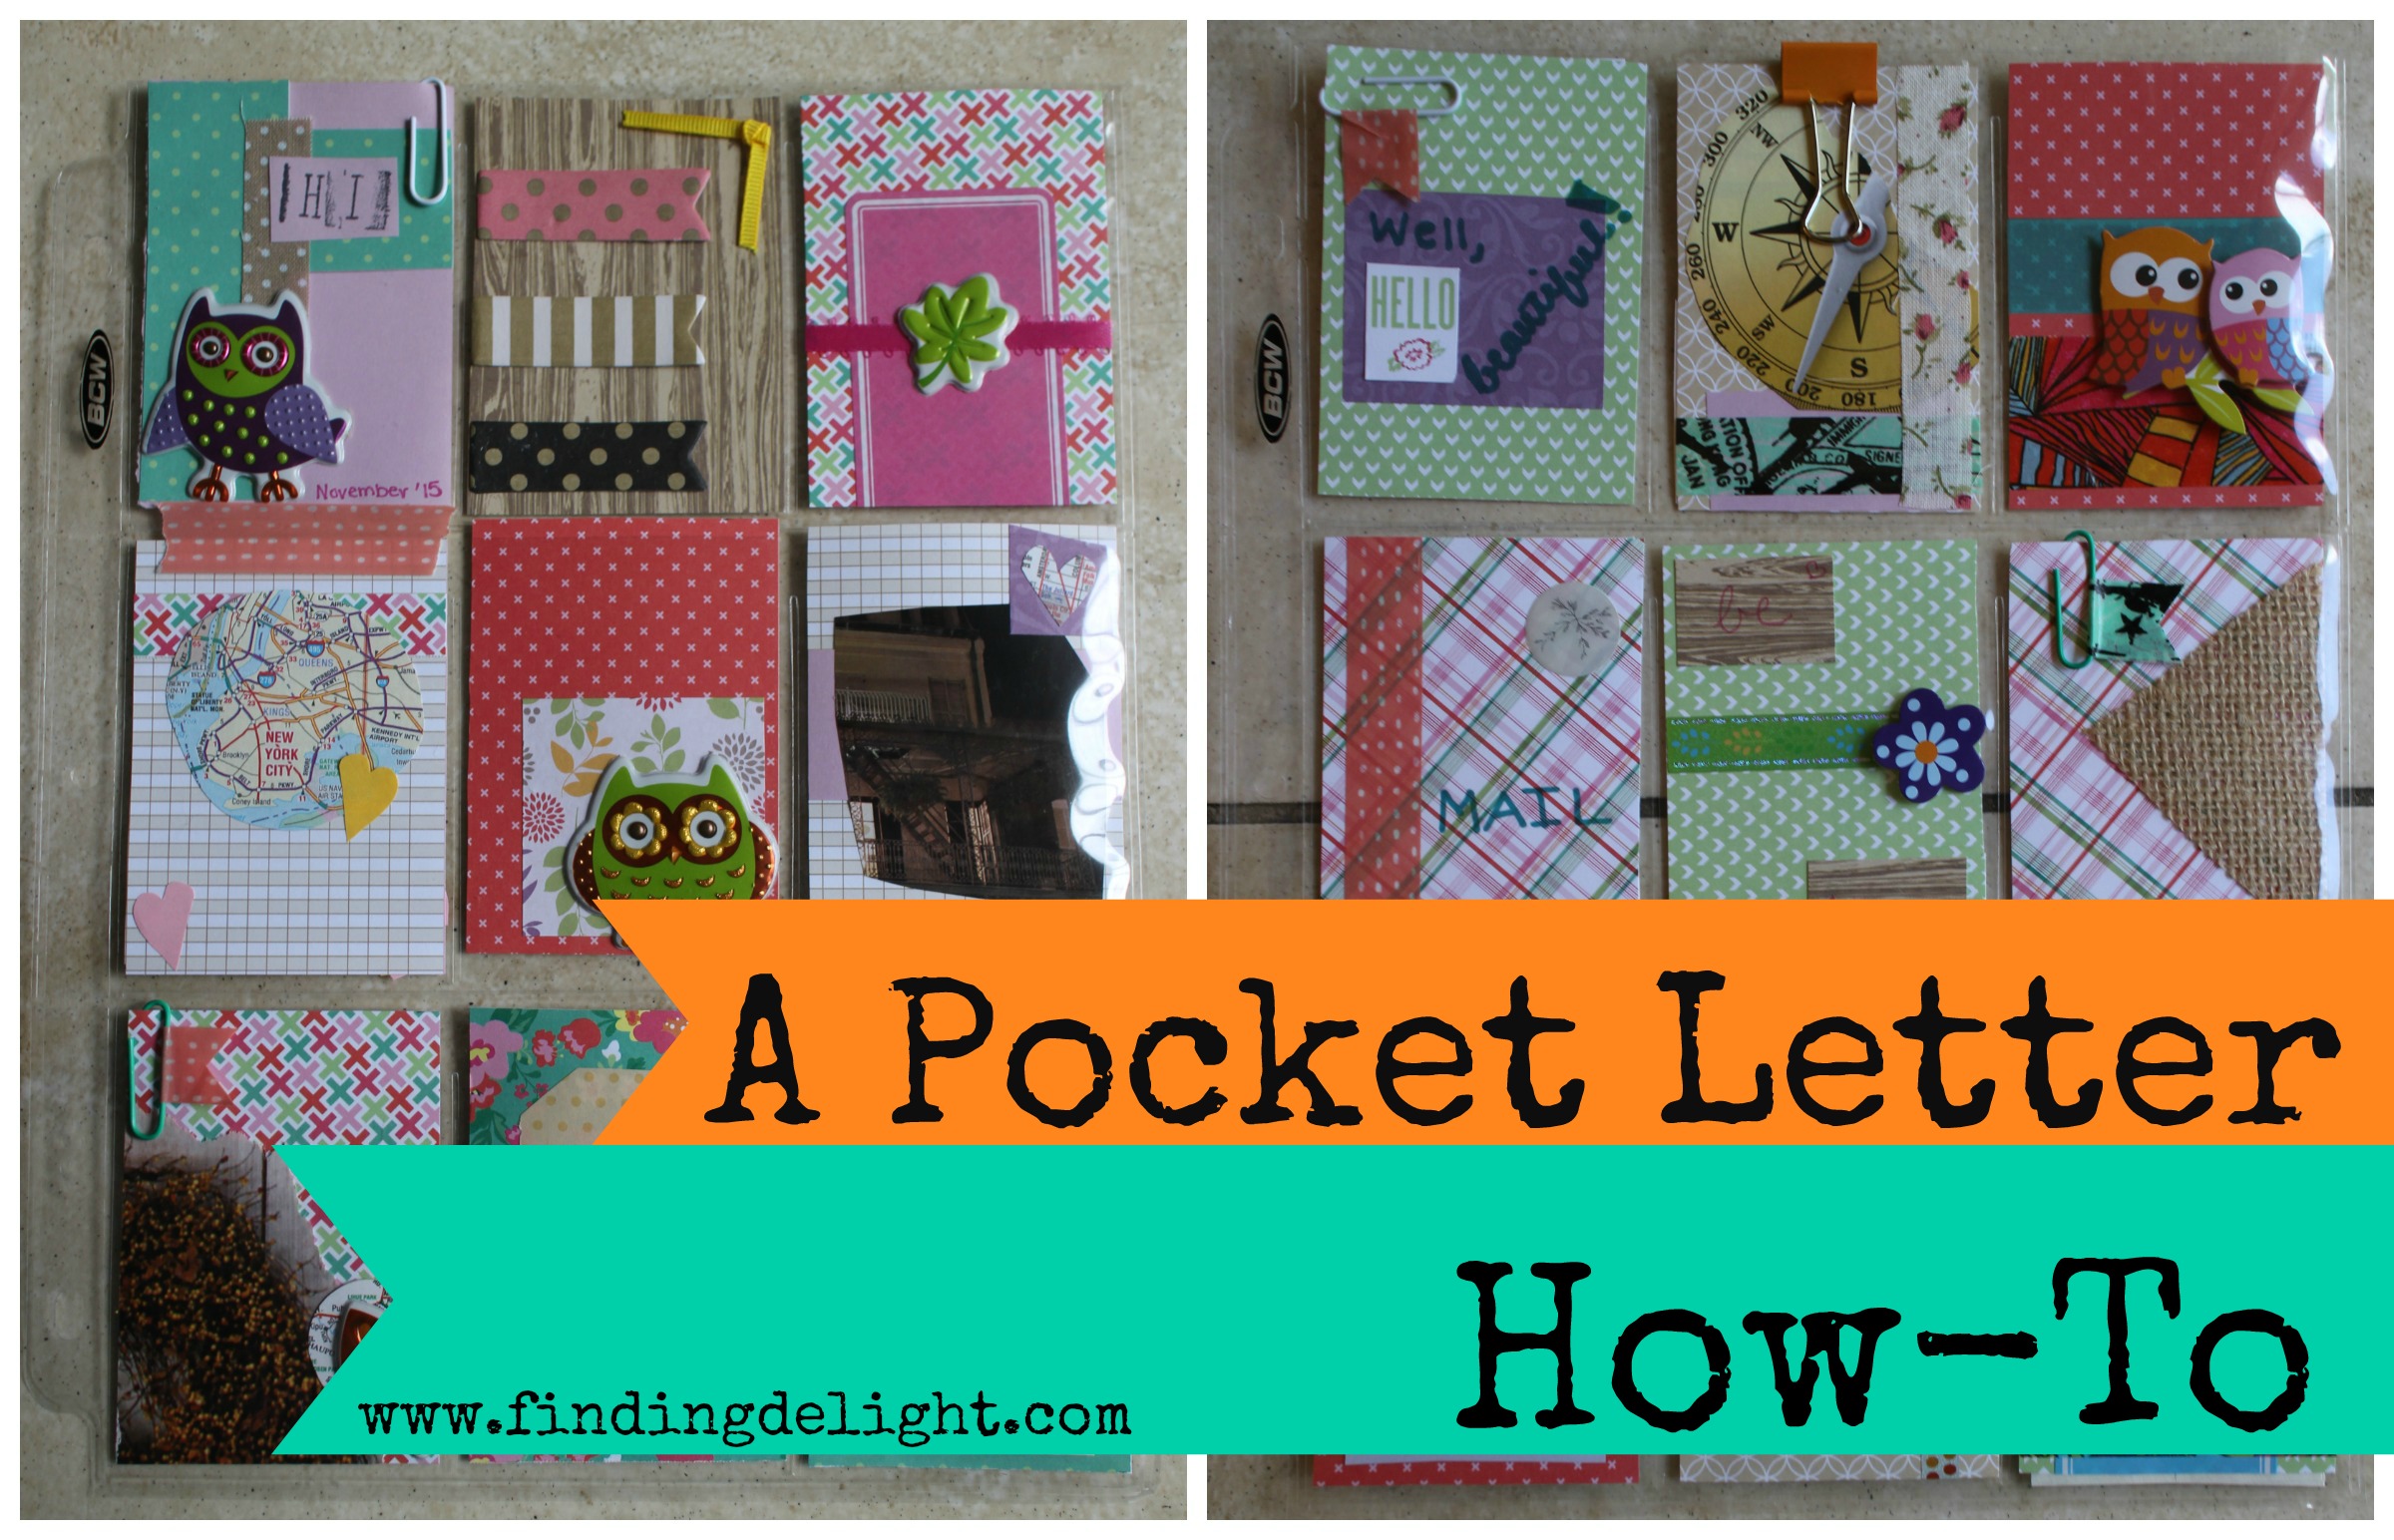
Pocket #1. I used some plain paper with my patterned paper as an accent and included some fabric tape I had on hand and a puffy owl sticker from Dollar Tree. I also stamped the top with alphabet stamps from Target Dollar Spot. On the back is a little bookmark to write down books read in December.

IMG_1675 IMG_1685

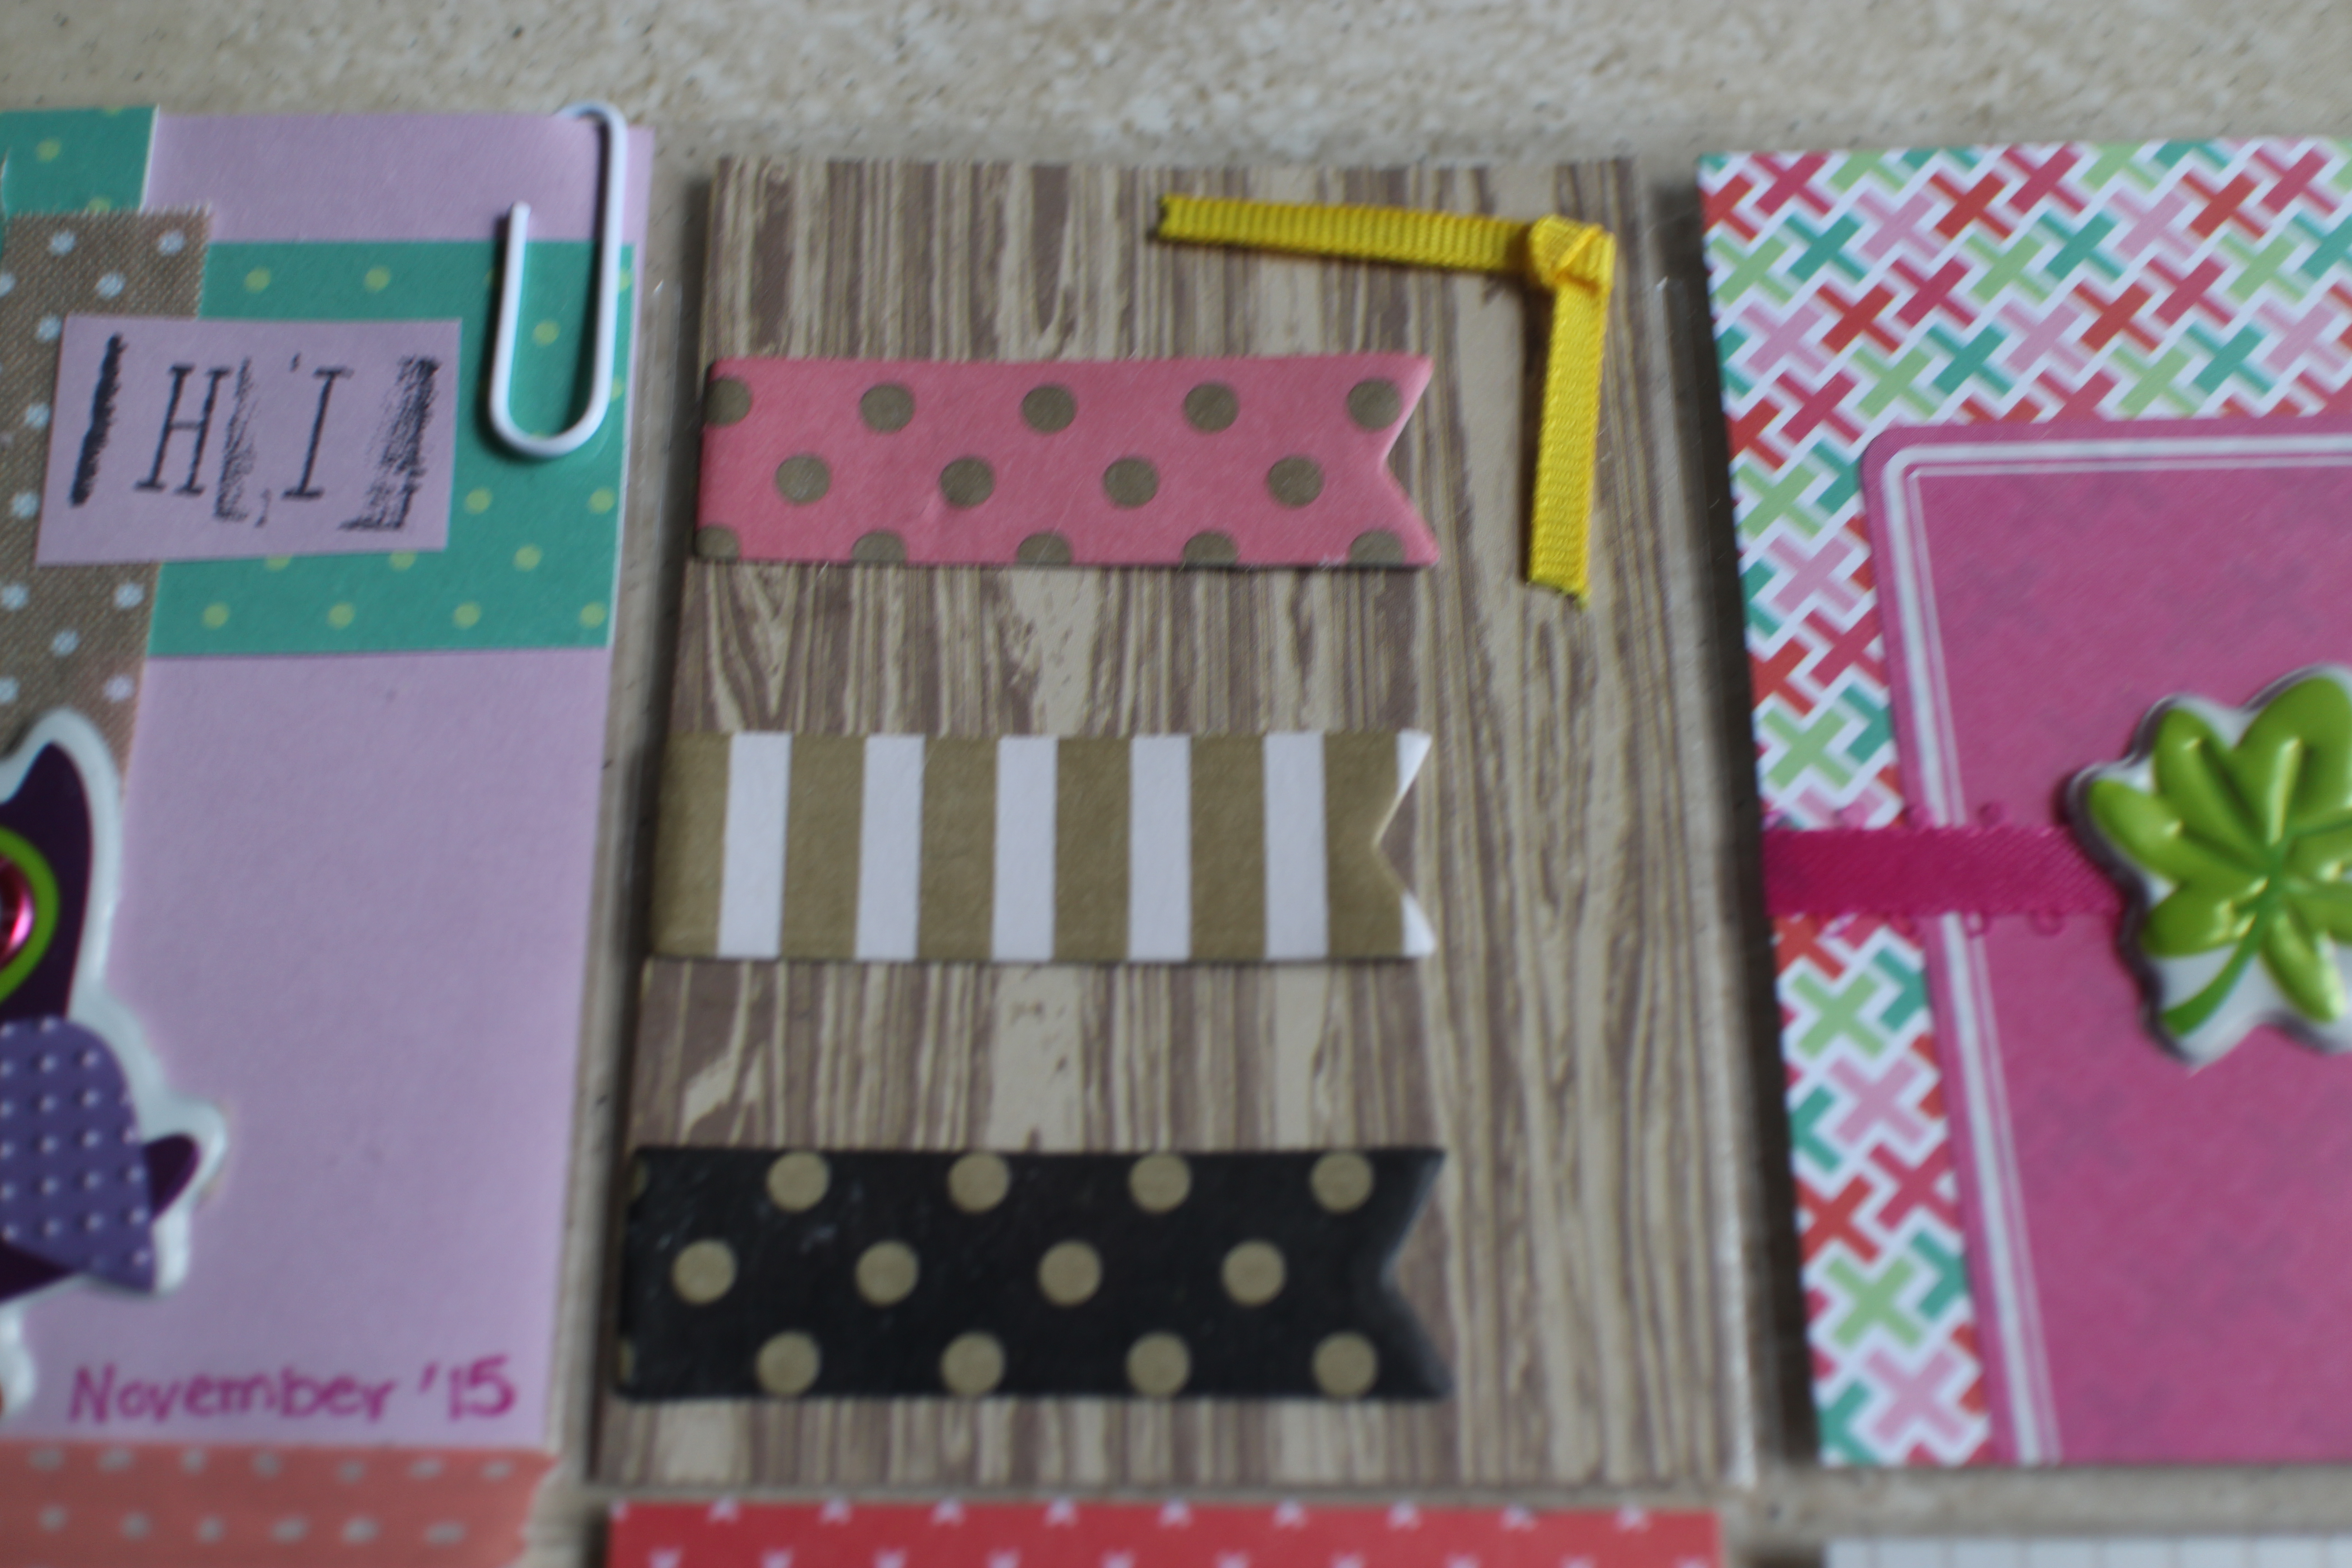
Pocket #2. Samples of page flags act as the main decoration with a little bit of ribbon accent at the top. On the back is a sample of post-it notes.

IMG_1676 IMG_1686

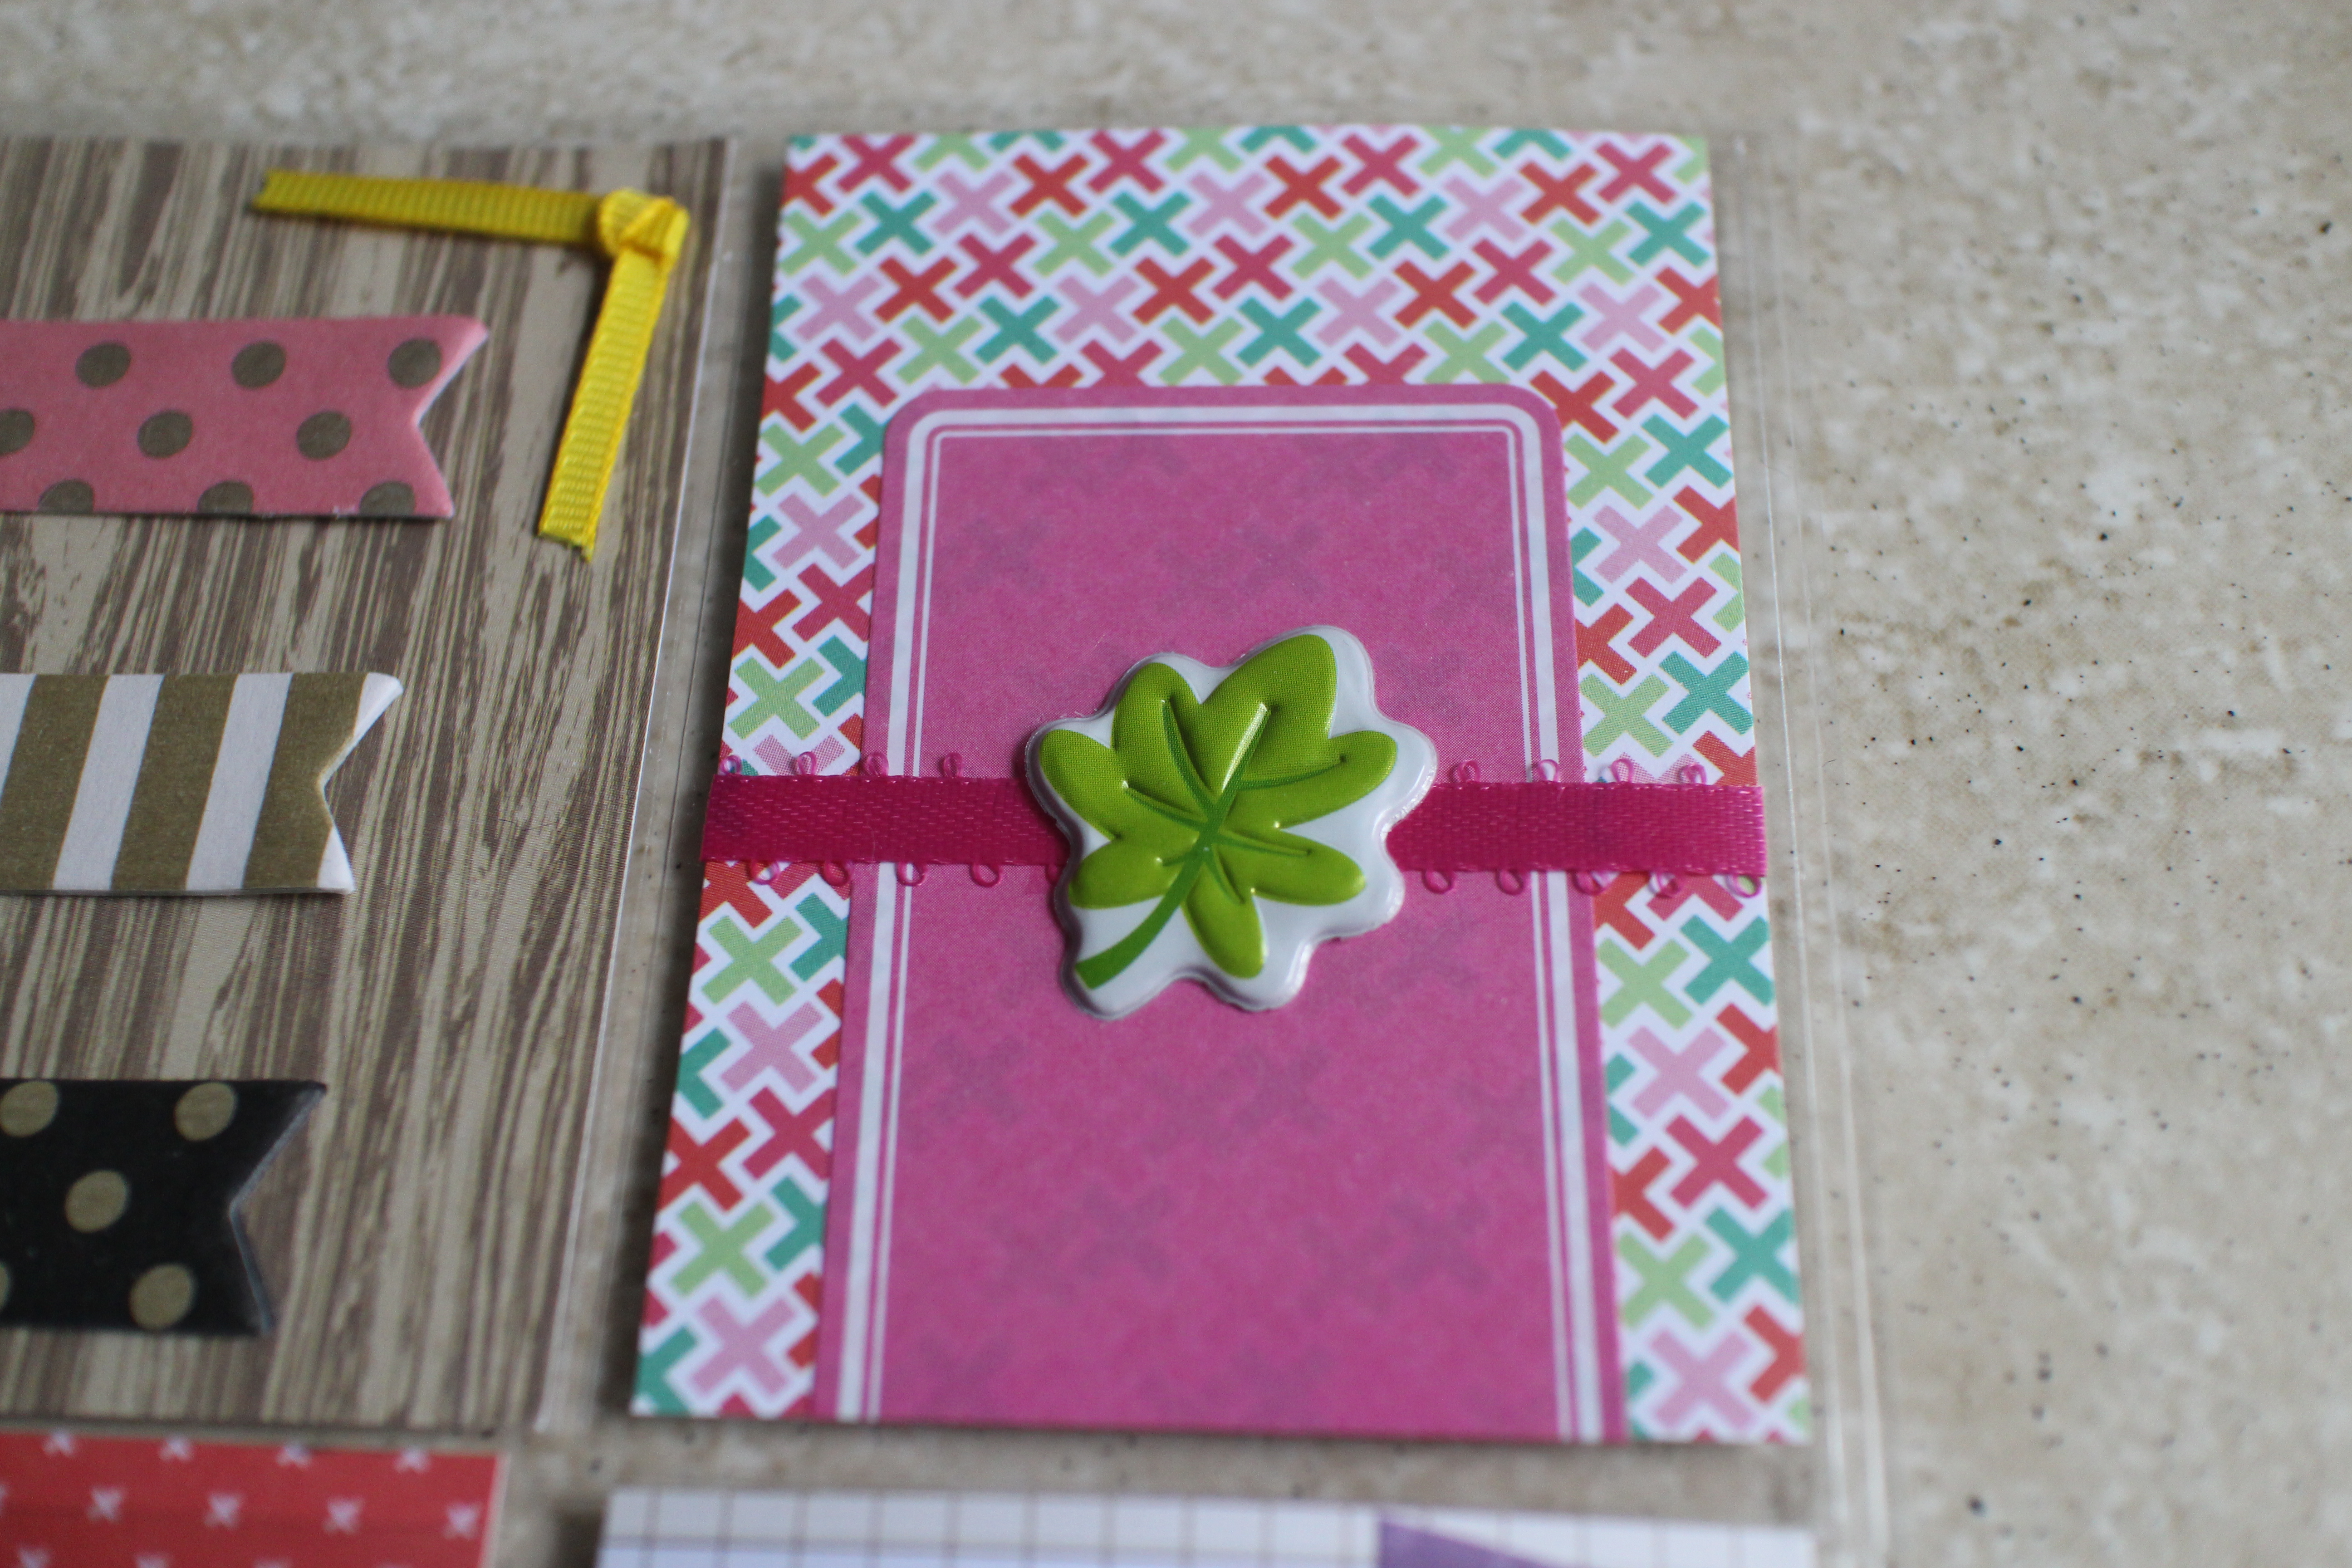
Pocket #3. Adhesive label, pretty ribbon, puffy sticker from the same sheet as the owls. On the back is a sample of a couple of washi tapes. To make sure the recipient can use the washi, make sure to wrap it around something with a glossy finish or some plastic.

IMG_1677 IMG_1687

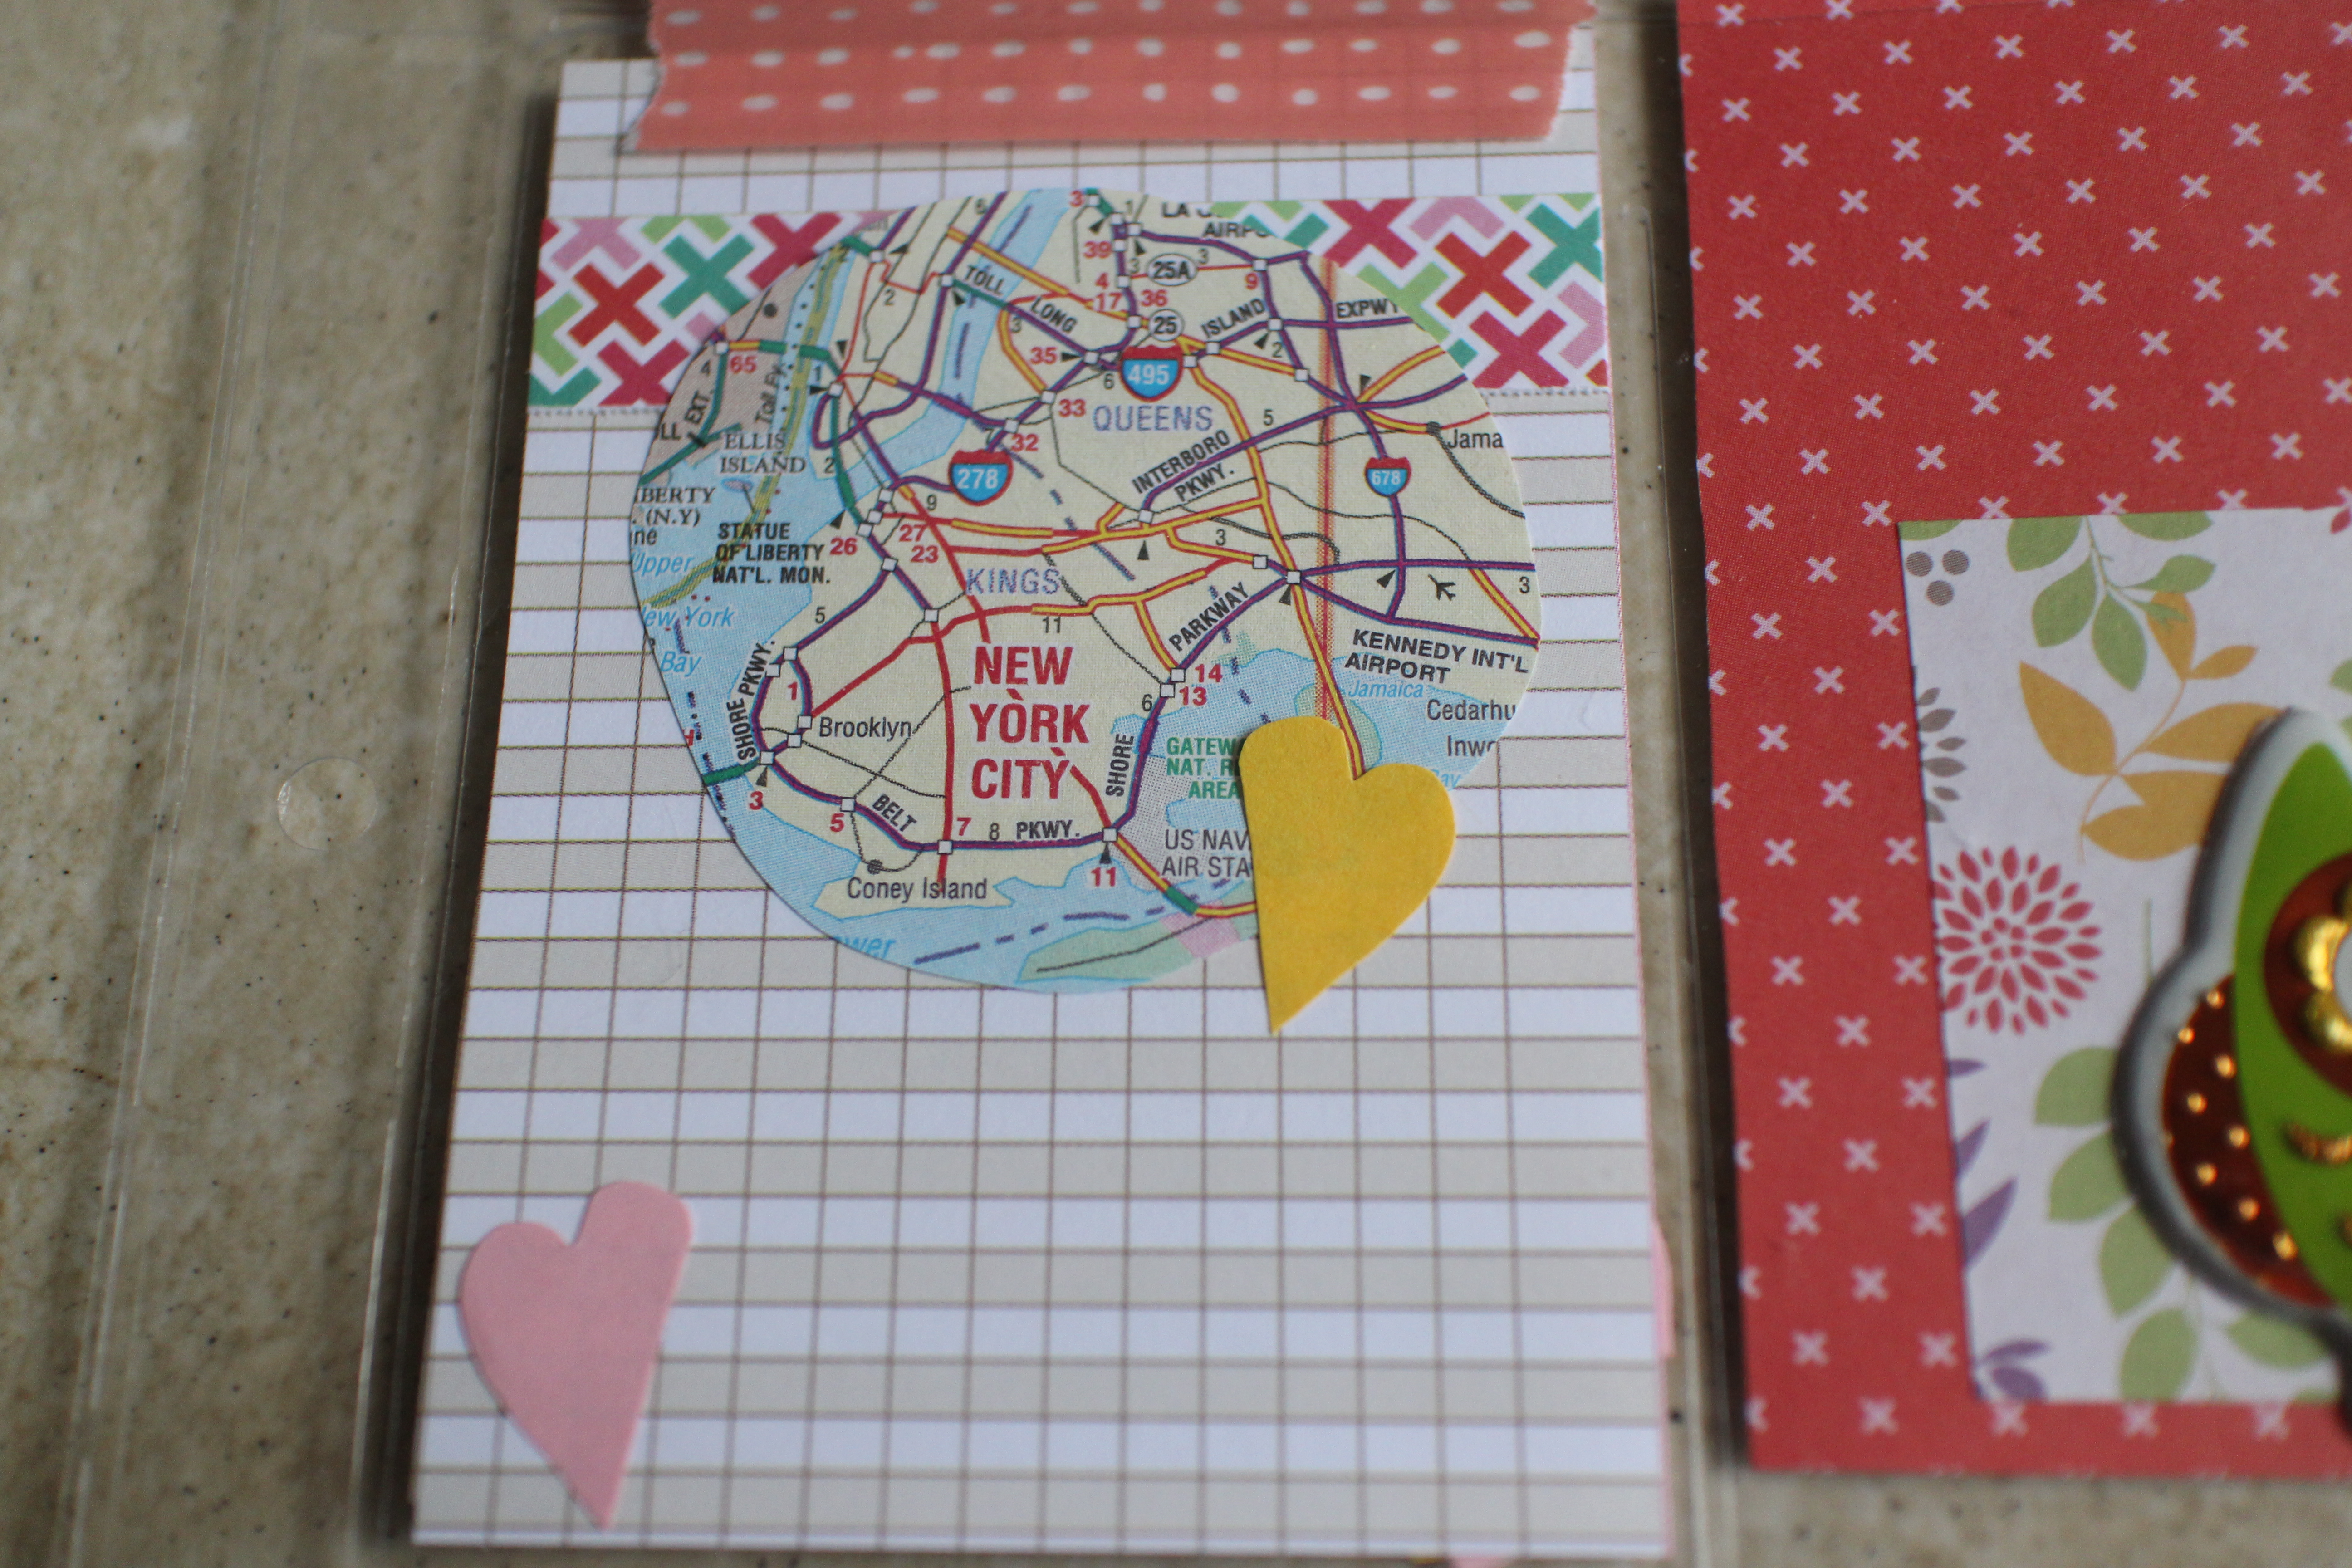
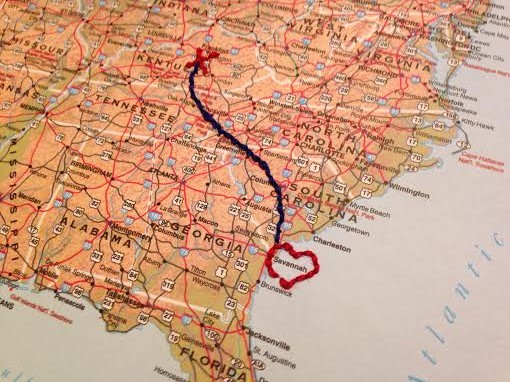
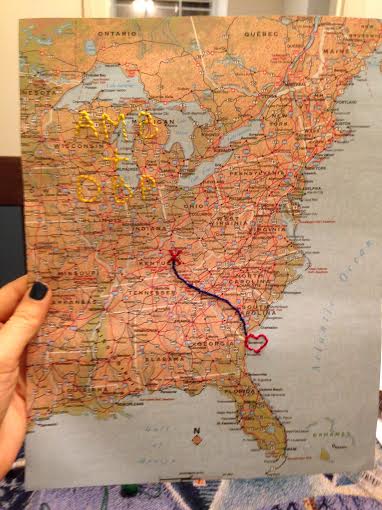
Pocket #4. I have a huge atlas in my craft box that I bought for this project. So I cut a little section out from that and added some paper hearts. On the back are more paper hearts and stars plus a tiny tin star ornament. The top of this pocket is washi taped down so these little pieces won’t fall out.

IMG_1678 IMG_1688

Pocket #5. The little square on this one is actually a cut out from a set of gorgeous sticker sheets from Dollar Tree. Topped off with another owl! A lot of PL’s include a tea in one pocket but the recipient of this one has enough tea to last a lifetime so I decided to include the sweetener instead. 😉

IMG_1680 IMG_1689

Pocket #6. I used plain purple paper as an accent and slapped a little magazine cut out of a New Orleans style building on top. The top corner is another square of sticker sheet topped off with a heart cut from the atlas. On the back I wound some ribbon around patterned paper and washi taped it in place. I was unsure about including this sample but I ended up loving how it looks.

IMG_1681 IMG_1690

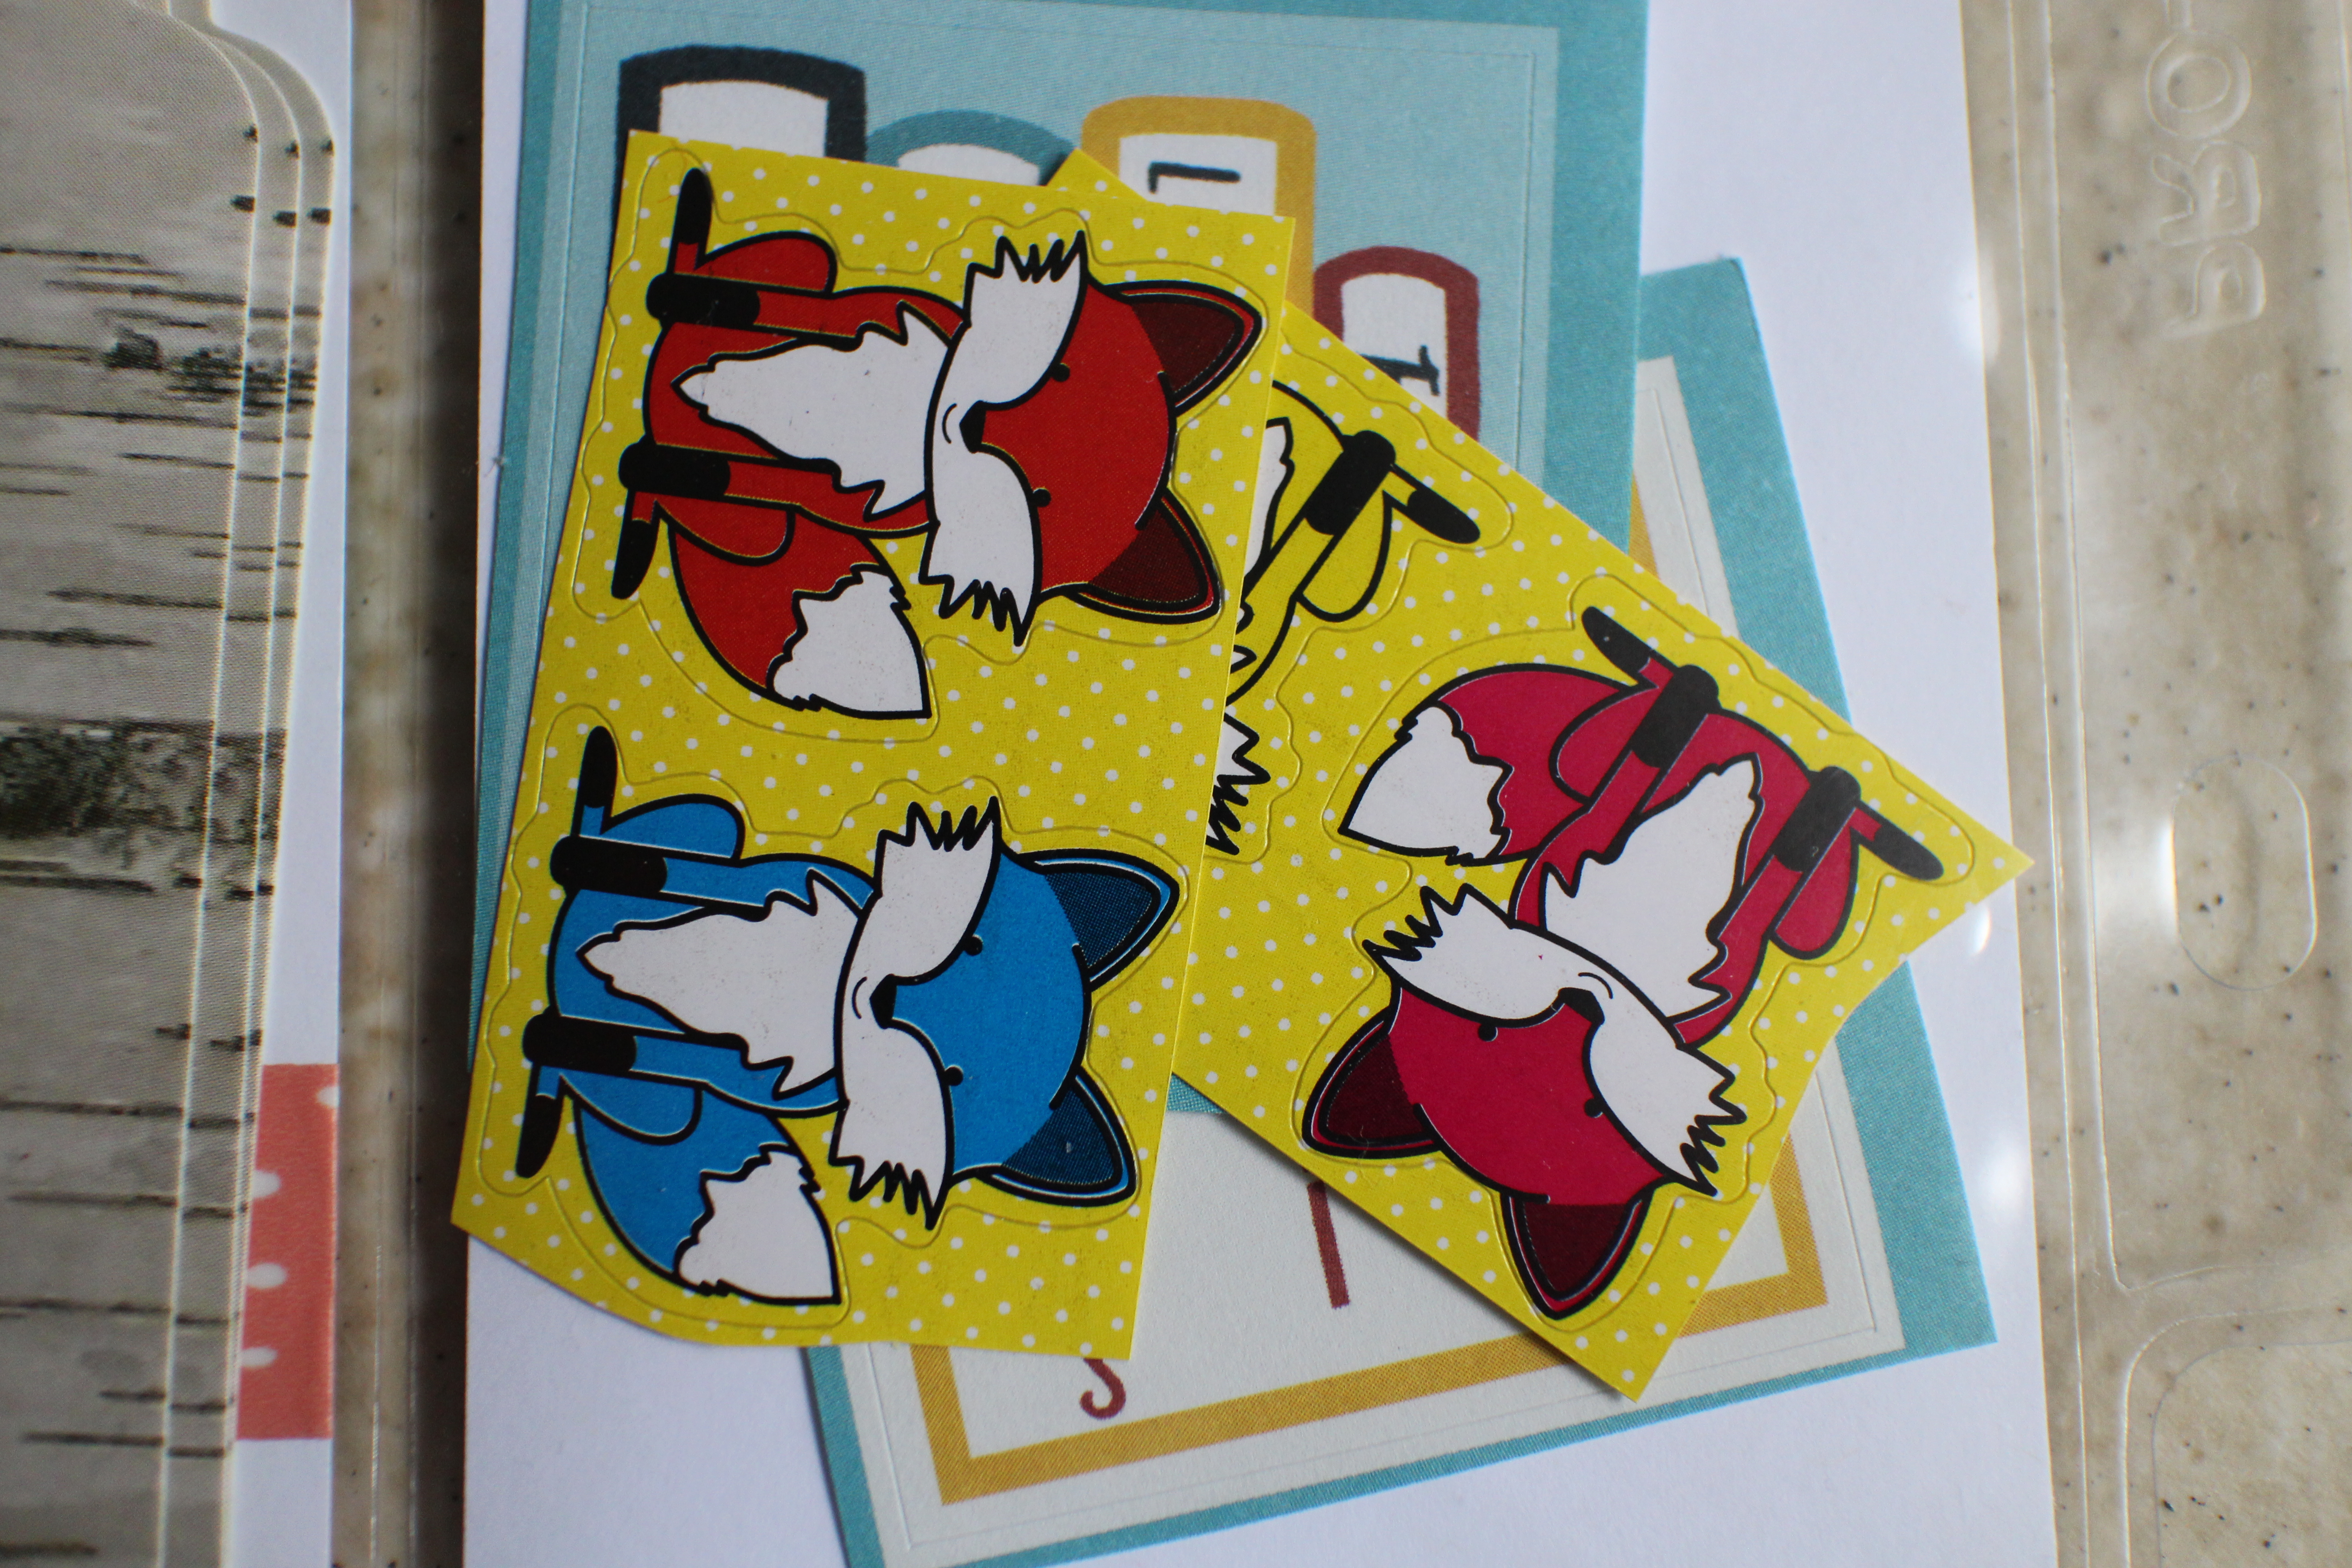
Pocket #7. Another magazine cut out, a circle from the atlas, and an autumnal puffy sticker. At the top I folded washi tape through a paper clip and cut out a triangle. On the back are two bookplates (from my stash) and a few fox stickers (Dollar Tree).

IMG_1682 IMG_1691

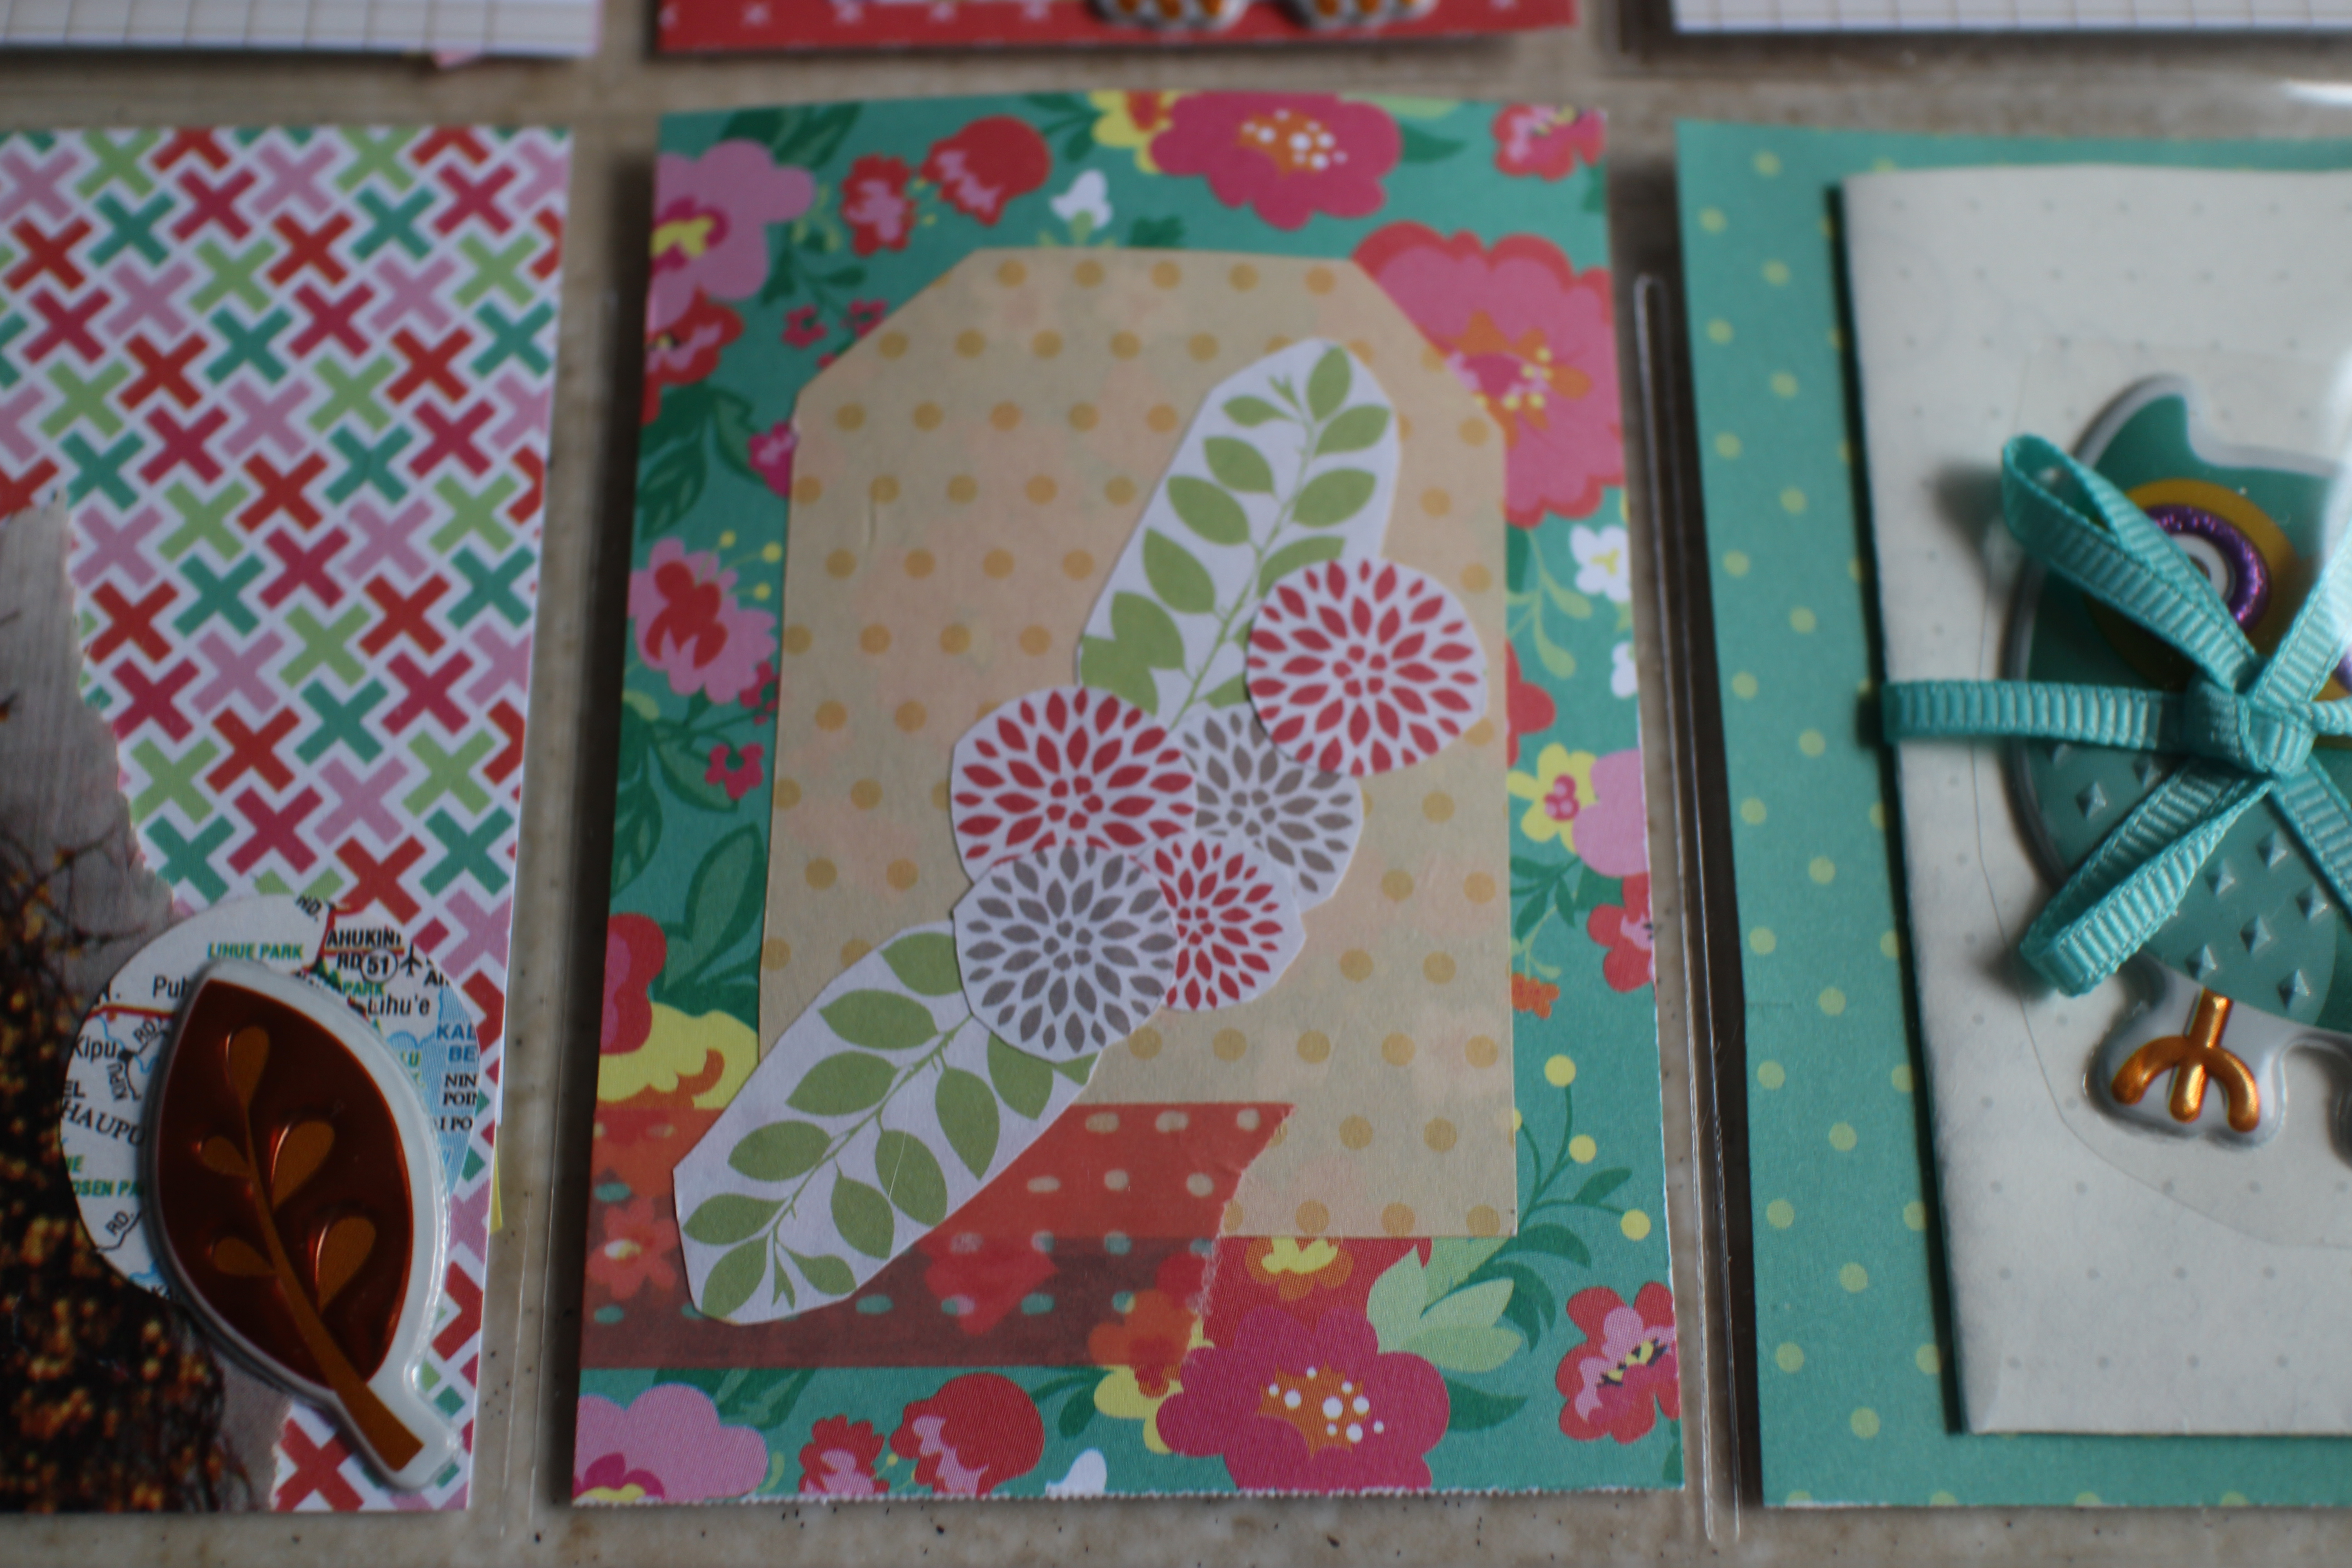
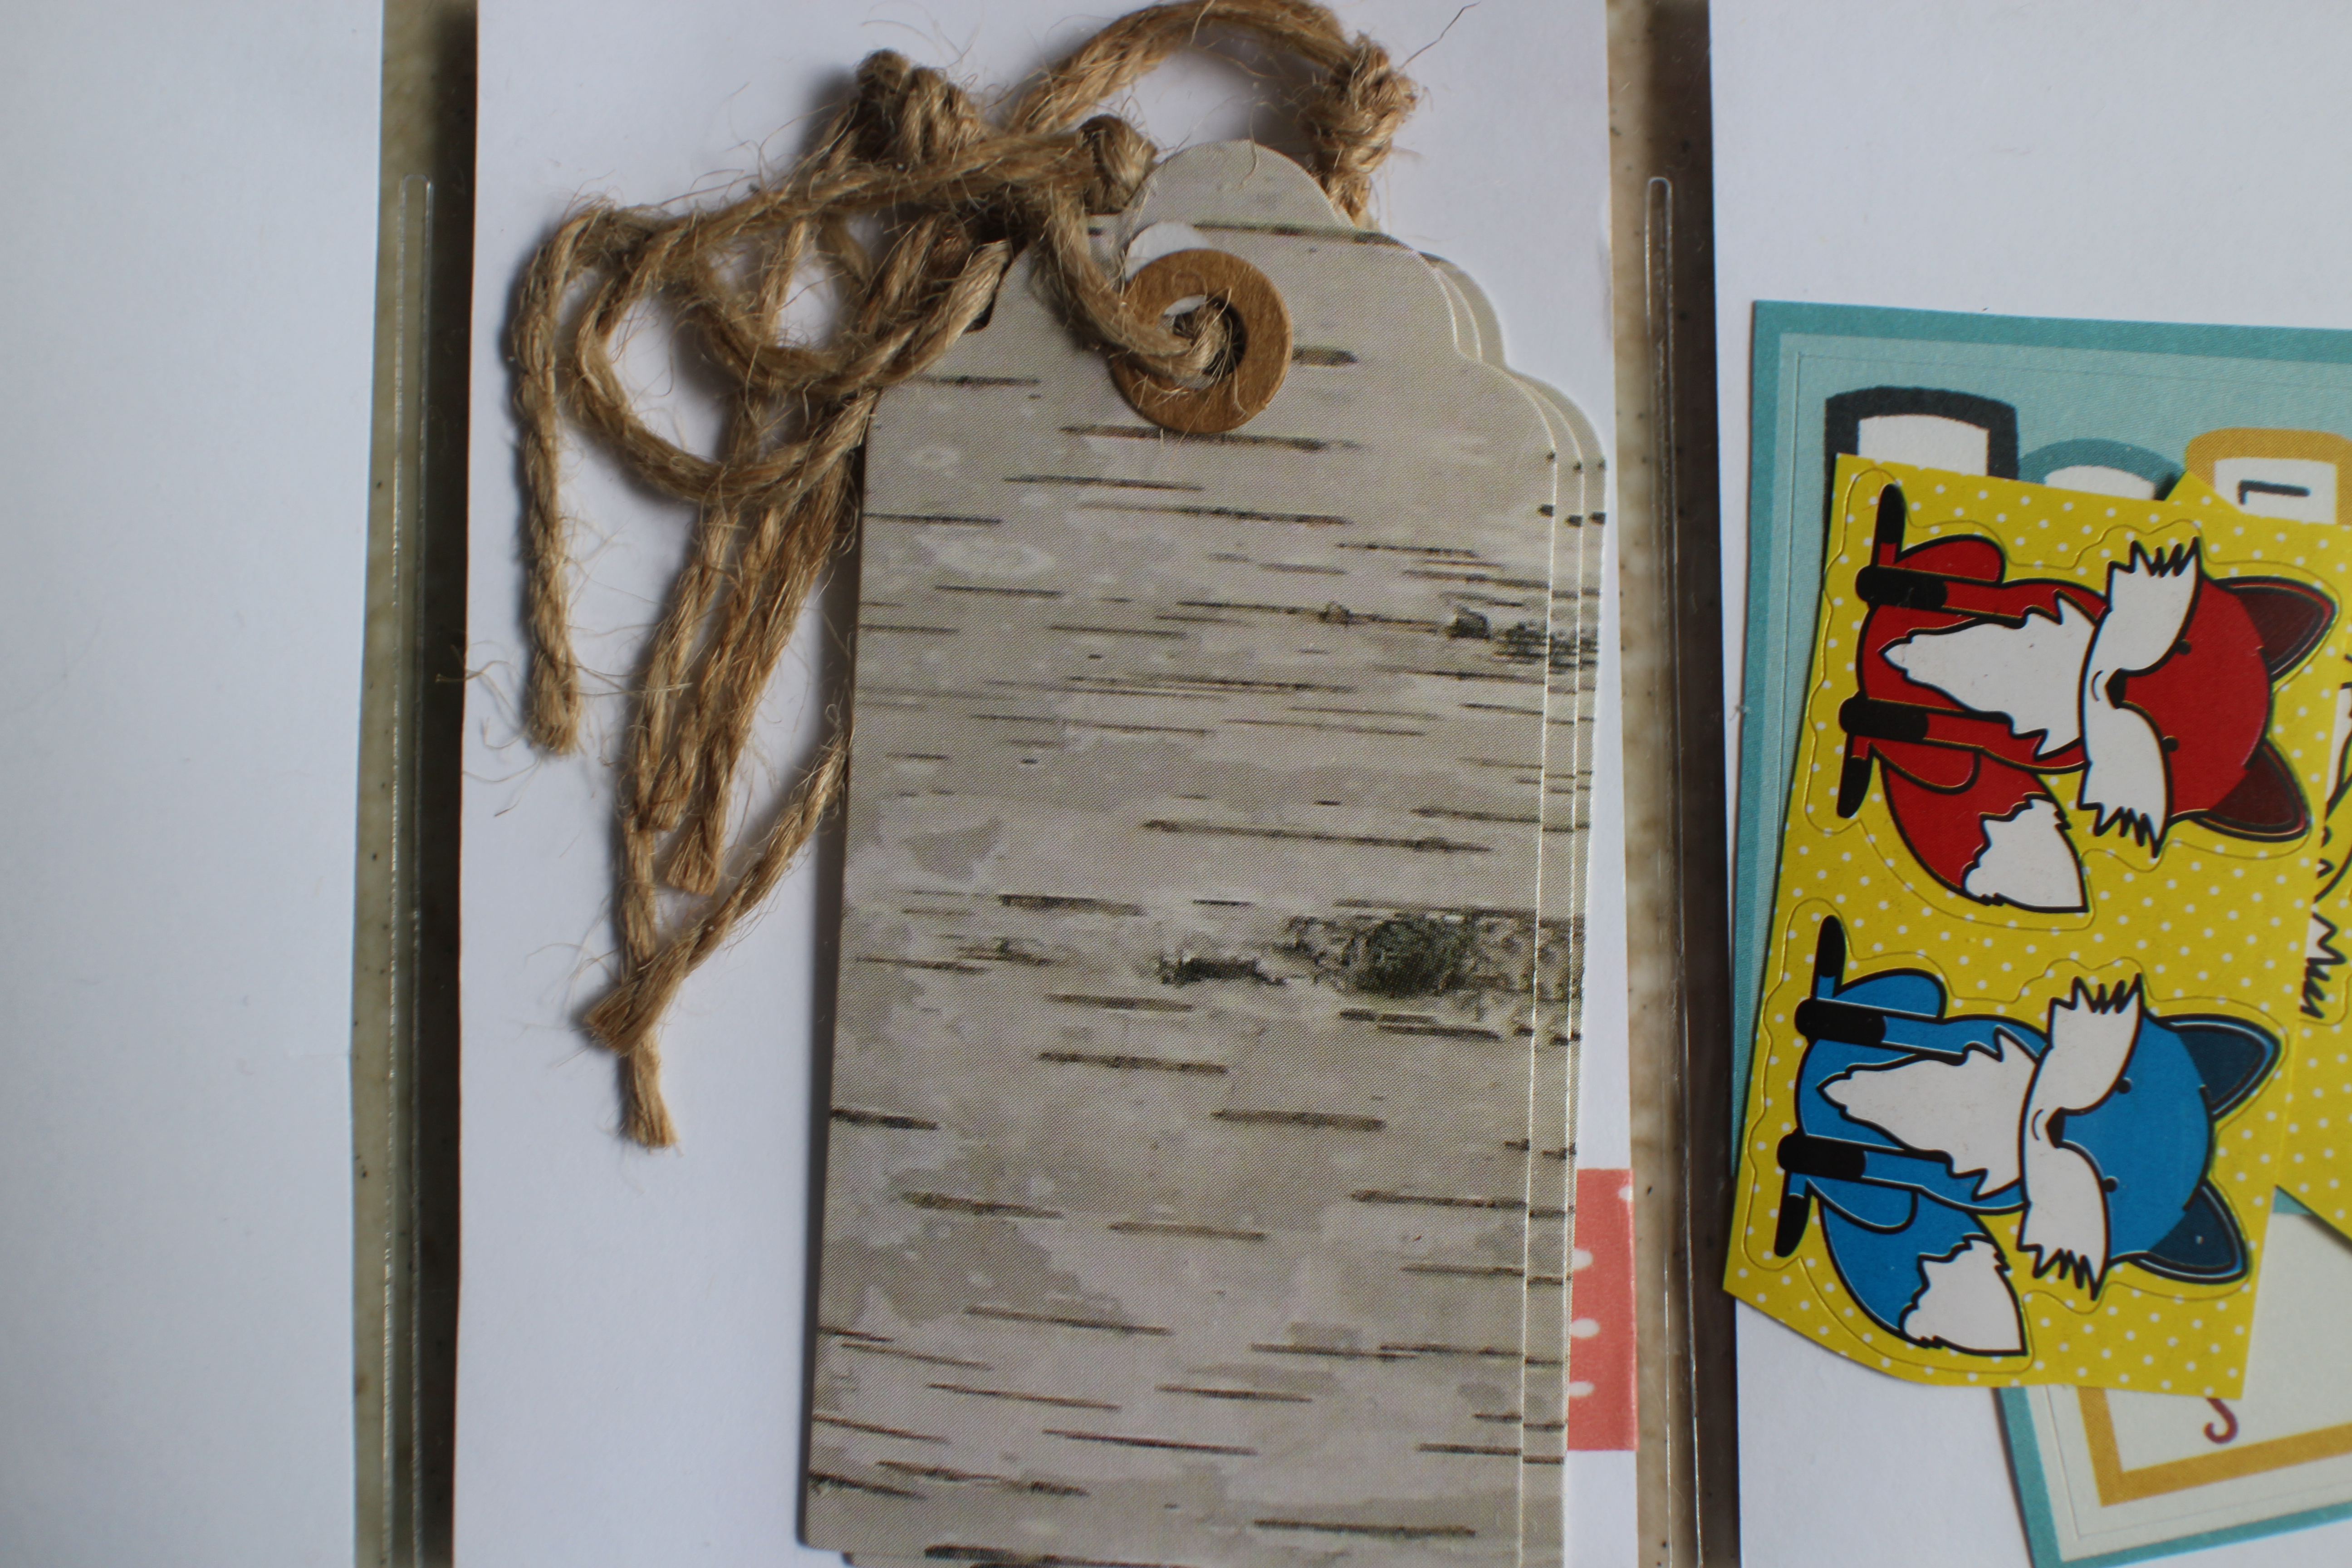
Pocket #8.  I cut some more sticker sheet into the shape of a gift tag to hint at what the goodie was for this one. I also cut out some of the shapes from the floral sticker sheet and made a little cluster for the top of the tag. The birch bark looking tags on the back are from the Target Dollar Spot.

IMG_1683

Pocket #9. For my final pocket I included my letter which I folded up and tied with some ribbon. I also tucked in another owl sticker which I left on the backing so the recipient could use it.

Wanna see another one!? Of course you do…

Front: 

IMG_1822

Back: 

IMG_1824

IMG_1825 IMG_1836

Pocket #1. A cut out from the purple sticker sheet topped off with a greeting. I included several paper clip flags on this PL because I think they’re adorable. On the back are a couple book plates.

IMG_1826 IMG_1835

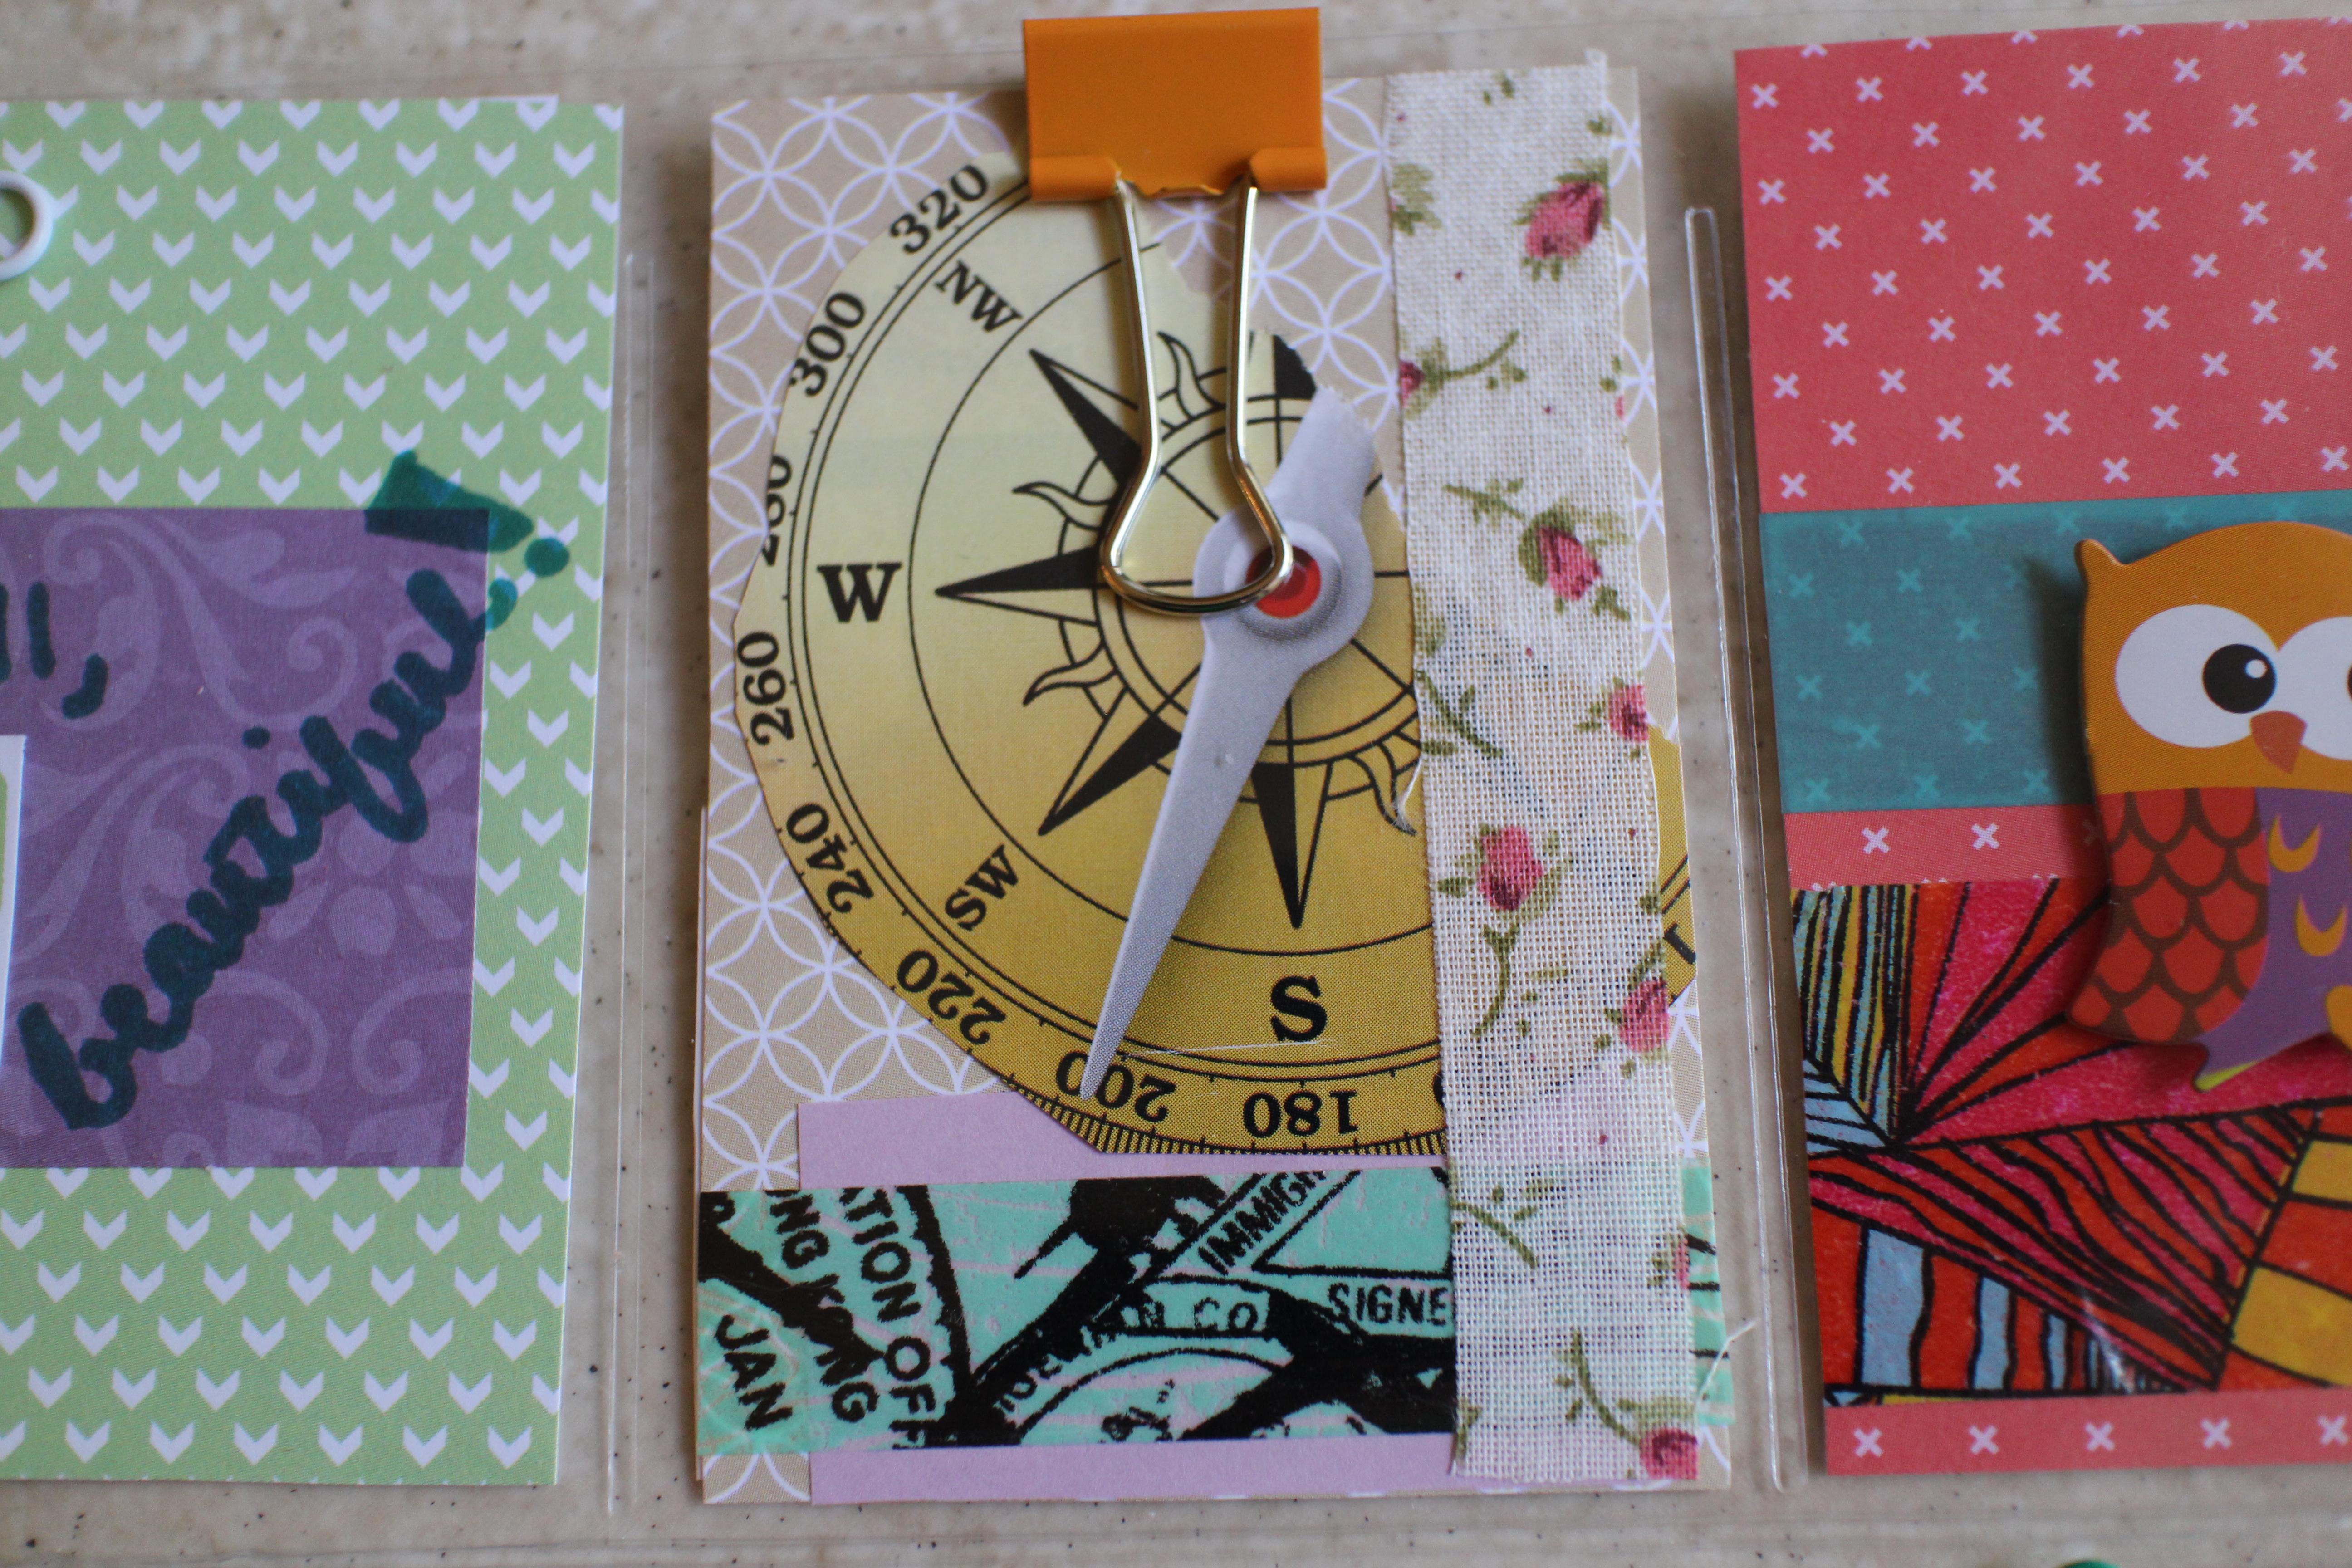
Pocket #2. I chose a magazine cut out of a compass as the focal point and accented it with fabric tape and a new travel-themed washi I recently procured from Dollar Tree. The orange binder clip holds a few stickers in place on the back and nestled at the bottom is a tiny card which I cut out from a larger card…more on that in a minute.

IMG_1827 IMG_1834

Pocket #3. More washi and more OWLS! These chip board babies are also from Dollar Tree just like their puffy counterparts. On the back are a few Christmas gift tags which I cut out from a box of cookies. I like that they’re bilingual.

IMG_1828 IMG_1839

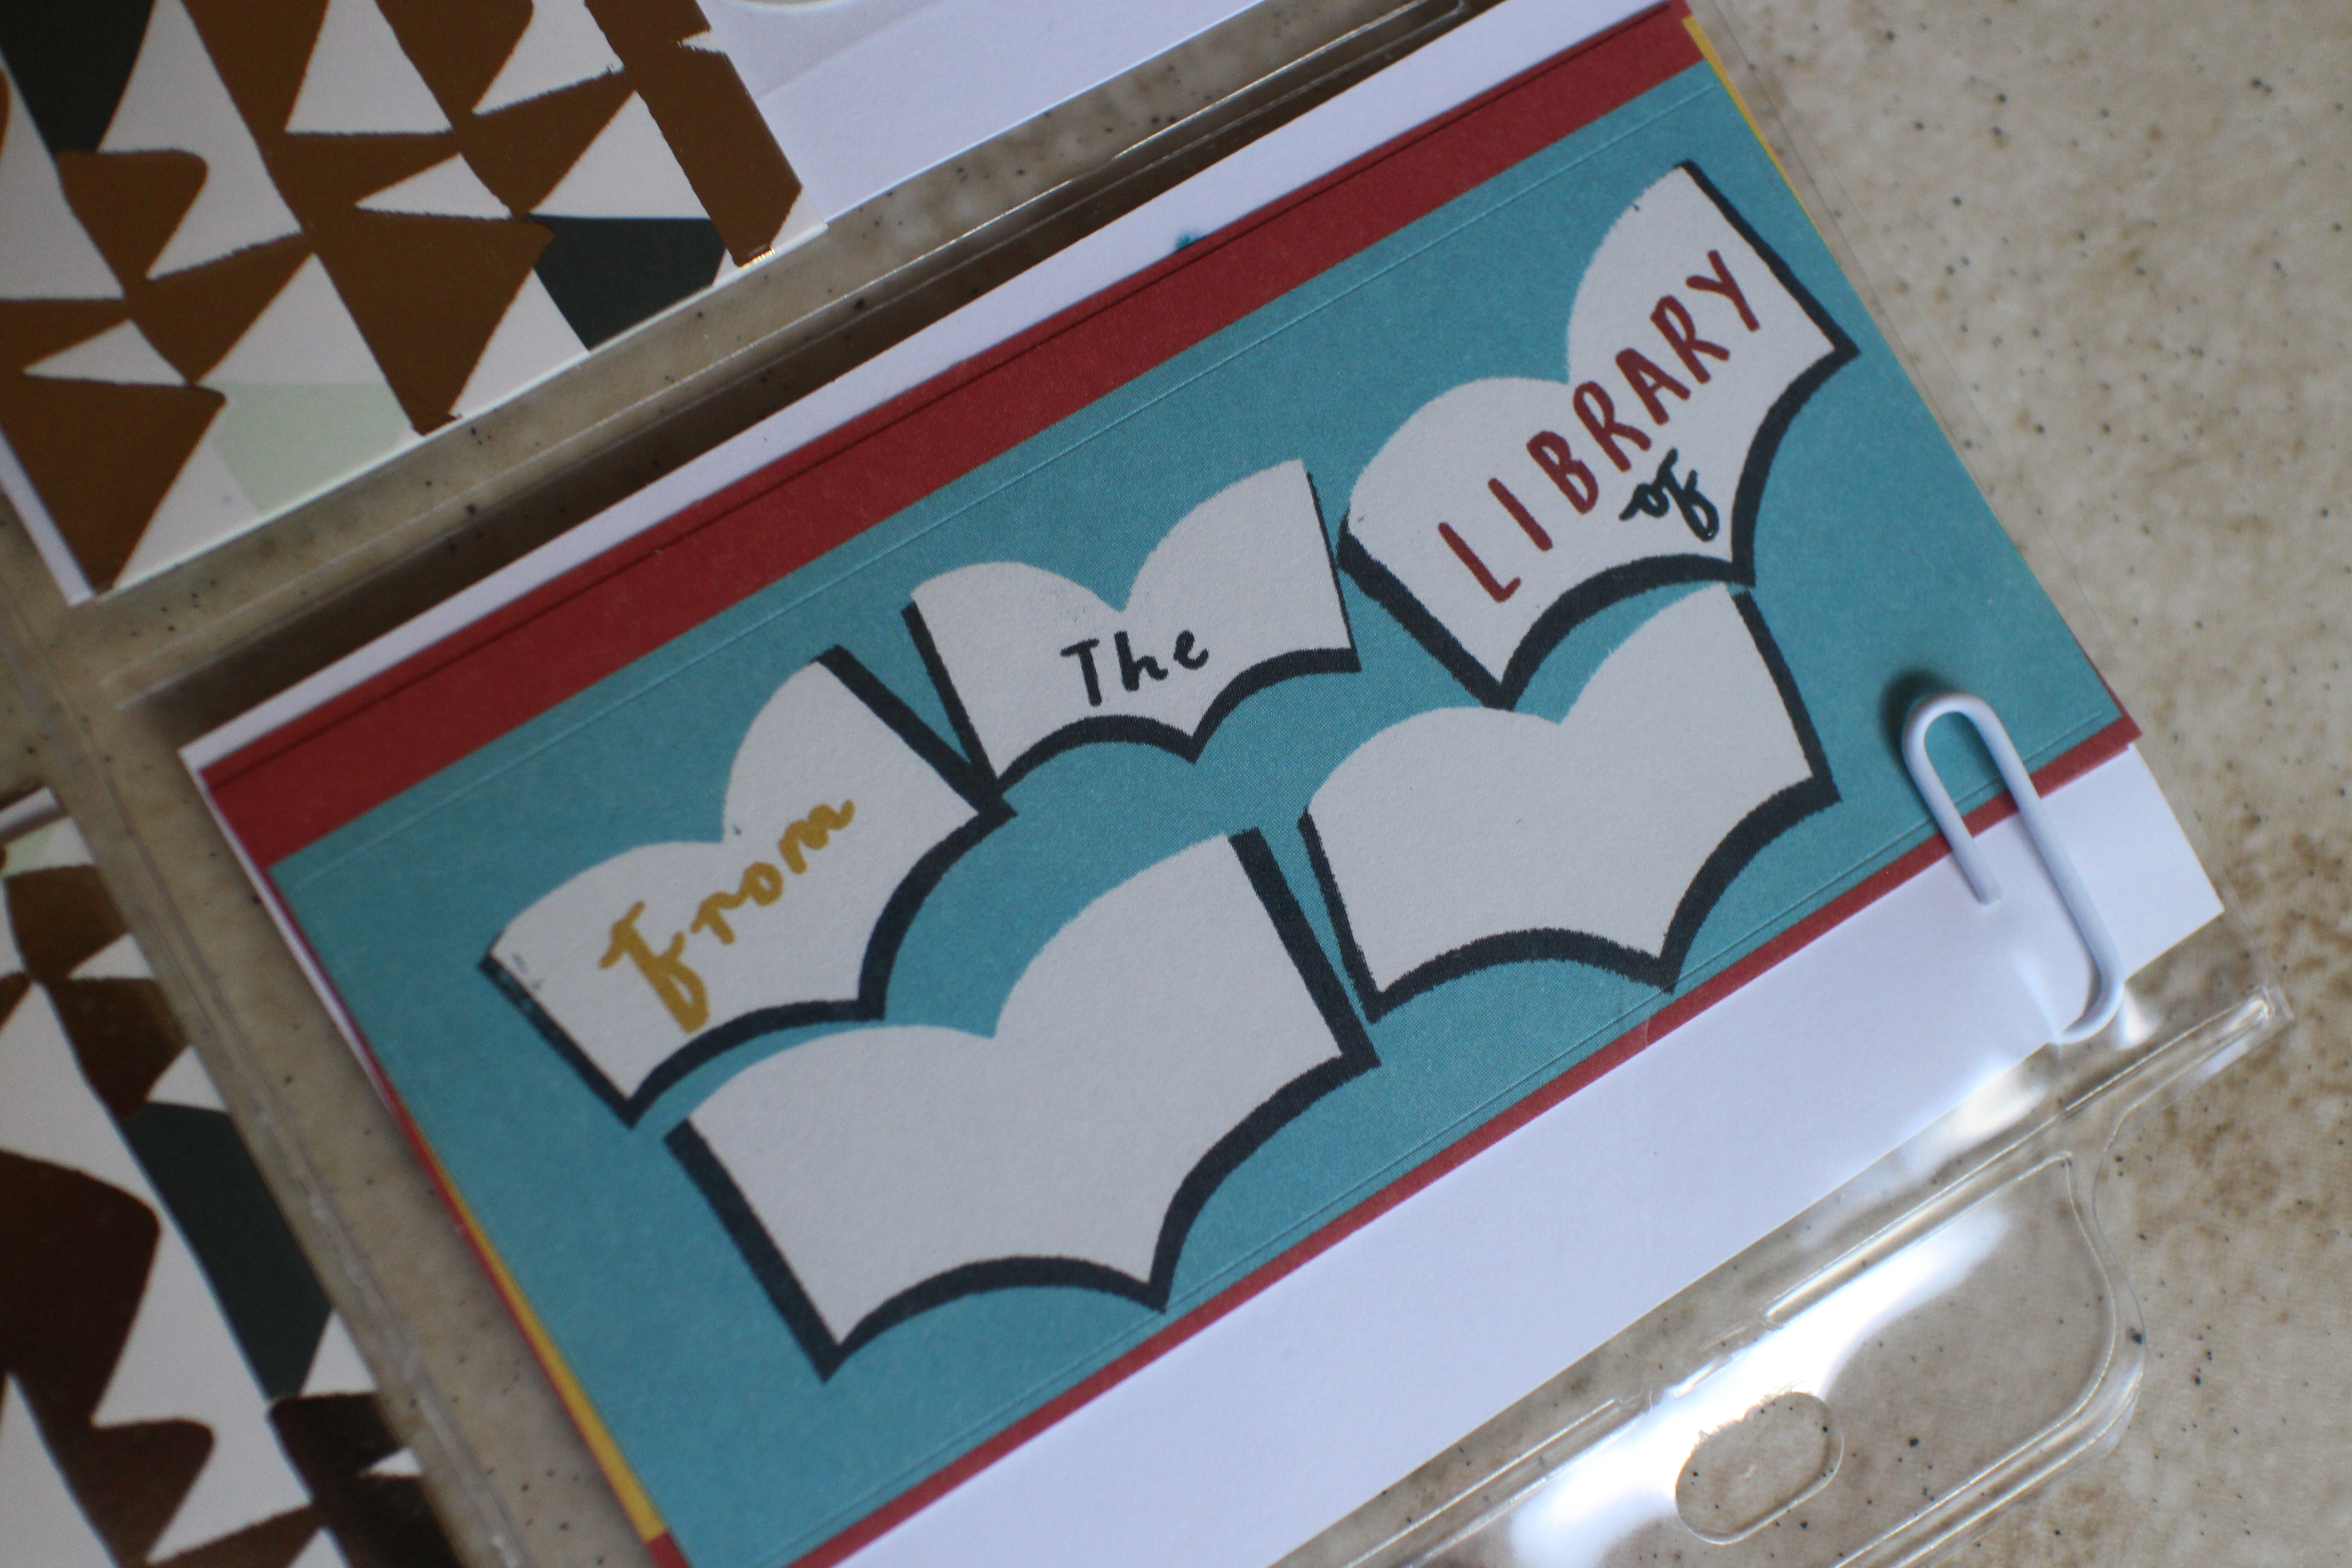
Pocket #4. This is the letter pocket! I cut a greeting card in half to create a pocket sized card to write my letter inside. The other half of the card I cut down to make the tiny card in pocket 2. The card is from a set I got at Target Dollar Spot.

IMG_1829 IMG_1838

Pocket #5. I cut out some of the wood patterned paper to write a little positive affirmation and included some sticker tape and a chip board flower. On the back is a post-it note sample.

IMG_1830 IMG_1837

Pocket #6. This pocket is decorated with some burlap I had on hand and another paper clip flag. On the back are bobby pins because what gal couldn’t use more bobbies?

IMG_1831 IMG_1842

Pocket #7. Just a simple “to” and “from” pocket with some plain purple paper and sharpies. On the back is a fabric sticker that I thought matched this PL quite nicely.

IMG_1832 IMG_1841

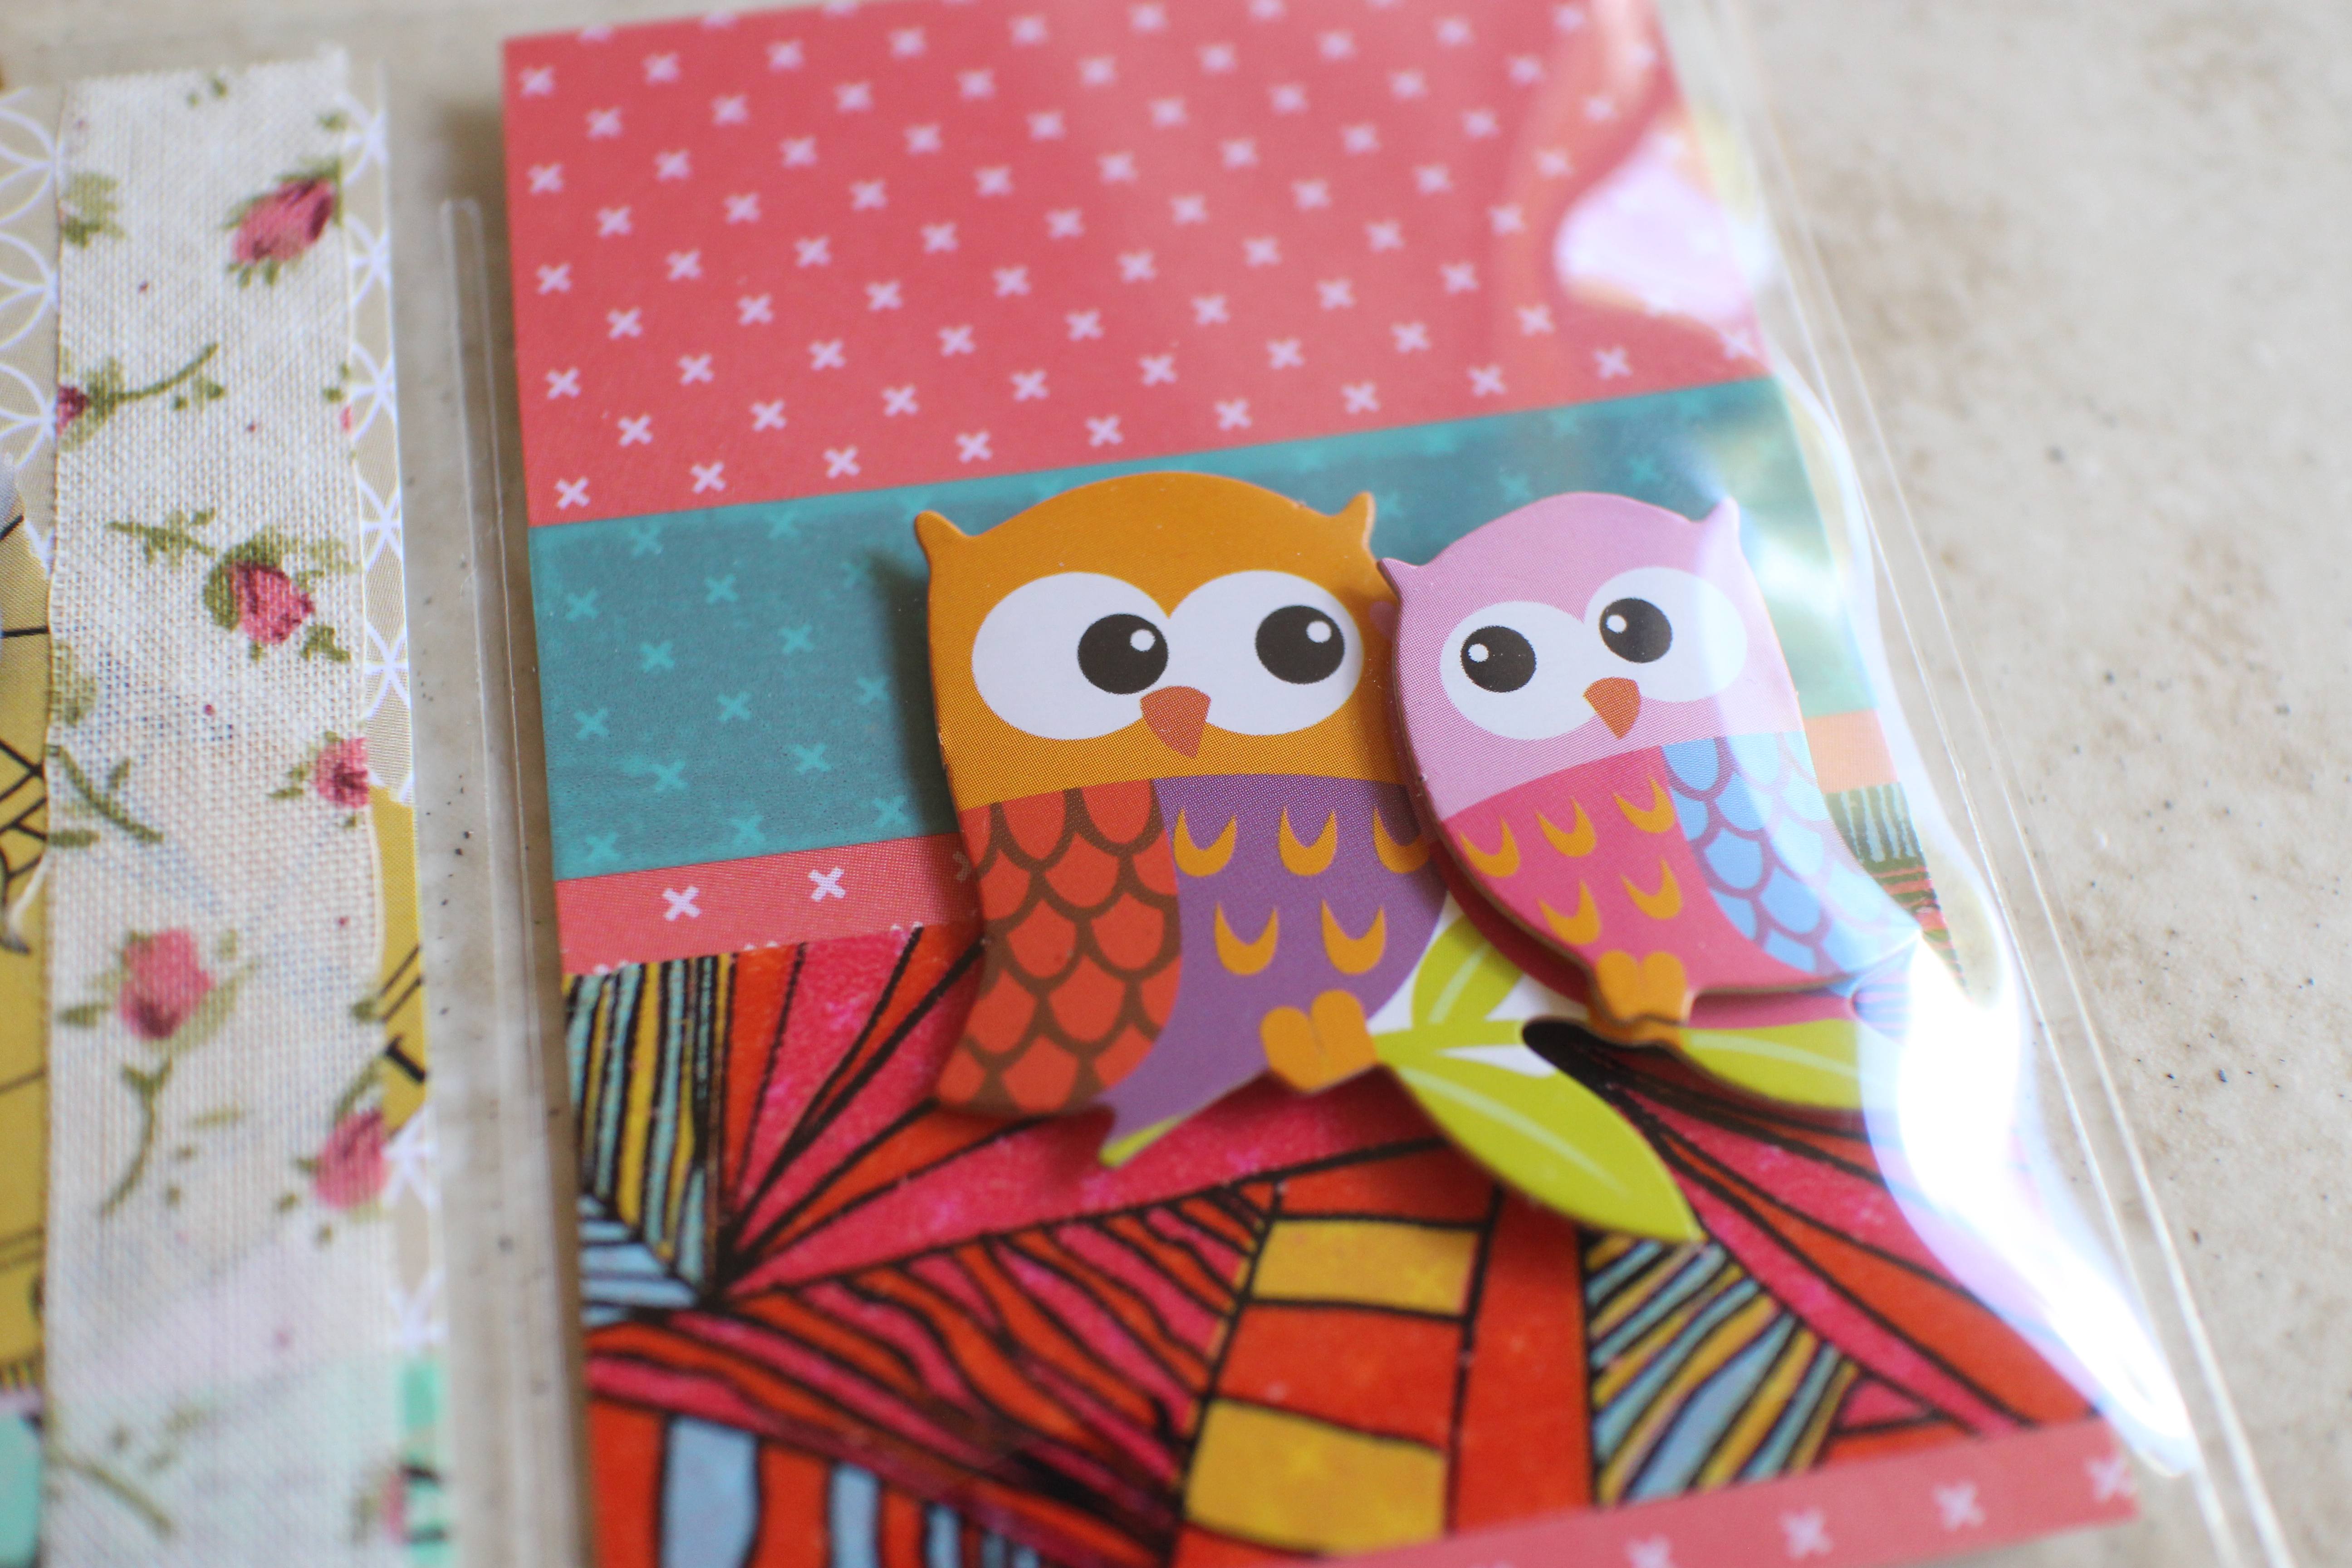
Pocket #8. Look at those owls! (Maybe my next PL will branch away from owls but they’re so darn cute!) I also used sticker tape on the side and attached another paper clip flag. On the back I included a ribbon sample.

IMG_1833 IMG_1840

Pocket #9. Last but not least, an adhesive tag decorated with washi tape and a Christmas tree sticker. Since I was gifting this PL in lieu of a Christmas card I wrote “merry christmas” and included the year. On the back I included some band-aids as the last time I saw the recipient she needed one and didn’t have any in her apartment, lol.

To mail my Pocket Letters, I sent them flat in a standard, page size mailer but you could also fold them and send them in an envelope, like so…

IMG_1694

Pocket Letters are super fun to make–calming handiwork that can be completed in one sitting–and they definitely brighten the receivers day! I’m so excited to continue making these in 2016!

pl2

Have you made any Pocket Letters? Or is this the first you’ve heard of the super cute mail goodies? Either way, if you’re interested in whipping one up and would like to swap with yours truly, do let me know in the comments below. Or if you would like to swap a PL from me for some other mail goodie from you, I’m totally open to that too! Let’s spread some postal positivity!!!


DIY: Peppermint Christmas Wreath (Under $25!)

My friend Katie is a wreath making MVP! She once gifted me a gorgeous burlap and floral wreath she whipped up as a house-warming present and I’ve been a huge fan of her creations ever since! When she was in Miami visiting us recently, she mentioned she was planning to craft up a new Christmas door dec once she returned home. I asked if she’d be willing to show us all how she does it and she graciously agreed! Let’s have a look…


If you are like me and enjoy cheap (but maybe a little time/labor intensive) DIYs this wreath is the perfect way to spend a few hours on your next lazy weekend afternoon!

Materials Needed:
Hot glue gun and glue sticks – $5
Foam wreath in whatever size your heart desires -$10.00
As many peppermints as you want (you will need a lot) -$6.00
Red ribbon- $4.00
** I definitely recommend hitting up your local Dollar Tree for the peppermints and ribbon!
wreath tutorial 1
Step 1: Wrap red ribbon around the foam wreath. This isn’t mandatory but I think it looks better if the ribbon is what shows through the openings after the peppermints are glued on.
wreath tutorial 2
**I just used regular tape to secure the ribbon but hot glue works as well!

Step 2: Start gluing the peppermints in an outline around the wreath. I stuck to doing the front of the wreath but if you are feeling ambitious you can do a border on the top too!

wreath tutorial 3
Step 3: Keep on gluin’! You can continue gluing in a straight line pattern or you can do more of a bricked layout. Since not all of the peppermints are the exact same size it can get a little tricky but sometimes you just have to fake it till you make it.
wreath tutorial 4
Step 4: Wrap the ribbon around the wreath and peppermints however much/little you want. This part definitely isn’t a MUST but I think it makes the wreath look a little more polished.
wreath tutorial 5
Step 5: Tie a big-ass bow (or little-ass bow). You can find some great tutorials on tying different types of bows HERE.
Step 6: Hang the finished wreath on your door and bask in the envy of your neighbors.
wreath tutorial 6
Isn’t it adorable, you guys?! Thank you so much for showing us how it’s done, Katie! Everyone go grab a glue gun and let’s make our doors a little bling! What do ya say? 

Christmas crafting with corks!

IMG_1713

Even with the tropical temperatures I’m in quite the Christmas spirit this year, you guys. I’ve been deckin’ ALL of the halls. I’ve also been feeling a compulsive urge to buy random craft supplies. Sooooo….gotta make like an elf and get to work! Here are a few snaps of my latest crafting endeavor. If you, too, have a few corks tucked away in a jar somewhere, PULL ‘EM OUT! This is how I used mine…

I rifled through my craft box to see what sort of supplies might be useful…

IMG_1697

…and came up with these! Little pom poms and push pins make perfect “ornaments.” Twine can be used to turn your little trees into ornaments. And those foam stickers in the center were a Dollar Tree find (and the ones pictured are just a FRACTION of the amount that came in the bag). I used the E6000 glue to attach my embellishments but ended up using my trusty glue-gun to connect all the corks.

IMG_1699

I made one little guy as a stand-alone tree to nestle onto a shelf on our TV stand. I love how the colors come out different on each type of cork. How cute is that gingerbread man?

IMG_1702

And I made another to hang on our  tree. For this one I included a tree stump by cutting a cork in half (with a kitchen knife and a cutting board…livin’ dangerously!) and adding a bit of ribbon for embellishment. I also secured some twine below the top cork for hanging purposes.

IMG_1705

I’m totally in love with them and think they have the perfect rustic look. They’ll also look totally different based on what you have on hand! So give it a try! It was a super simple and cozy evening activity.

And c’mon, don’t you just love an excuse to drink more wine this time of year?!

IMG_1720

What sorts of ornaments do you hang on your tree? Do you make your own or do you stick to store bought baubles? Does your tree have a theme? I’d love to hear! 


Dollar Tree DIY: Simple Thanksgiving Centerpiece

dollar tree diy

With Thanksgiving fast approaching, I thought I’d share a super simple way to make your table a little more special on the big day! On Saturday I had a poke around our local Dollar Tree for craft supplies. (If you love crafting, scrapbooking, DIY home decor, etc my biggest money saving tip is to check out dollar stores BEFORE shelling out beau coups cash at places like Michael’s.) With my materials in hand I couldn’t wait to get home and start throwing them together! If you’d like to dress up your table for Thanksgiving, check out what you have on hand. You may be able to use this tutorial as a guide to put together something similar. Then, when Turkey Day rolls around you can lay out some place-mats and cloth napkins, put on some sweet sounding music, and start serving up your favorite dishes. The perfect, classy aesthetic for an intimate and simple Thanksgiving feast!

Bonus: I fully plan on switching out the more autumnal looking flowers for Christmas-y ones (poinsettias maybe?) and rolling this little set-up straight through December!

Ok, enough chatting! Here’s how you can get a similar look for your Thanksgiving table…

What you’ll need: 

IMG_1628

  • a bag of clear glass gems
  • a couple fake flowers (Typically the fake flowers from Dollar Tree come all connected in a bunch of three. I cut these two off…and probably ruined a pair of scissors in the process since the stems are plastic covered wire. C’est la vie!)
  • tea light or small votive candle
  • glass vase
  • scissors
  • gold jingle bells (I picked up a bag of tiny ones and a bag or normal sized ones because I thought it would be more visually interesting. Not necessary.)
  • postal twine
  • coordinating ribbon (I used a roll of white with gold polka dots that I had on hand from a previous project.)

Not pictured because I was just making this up as I went–

  • E6000 glue
  • 2 jars (Mine used to hold pickles! You could use mason jars or whatever you have.)
  • 3 cups of dried lentils

And how it all comes together:

IMG_1633

Pour the glass gems and jingle bells into the bottom of the large vase and make sure they’re all mixed up.

Create a little hole in the center and nestle the candle down in all those shiny baubles!

IMG_1634

Measure out some pretty ribbon and two lengths of postal twine, all the same length.

Lay these three pieces together and tie them all around the top of the vase in a bow. I liked the layering look of combining the ribbon and twine together but you could use one or the other. OR include more lengths of both to bulk it up a bit. Up to you!

IMG_1640

I love how the glass stones and gold bells reflect off each other…and the more rustic bow balances out all that bling. I can’t wait to see how it looks when the candle is lit!

Because I ended up liking this vase as is (without including the flowers), I started grabbing elements from my kitchen to make a couple side jars. I glued the same ribbon around the middle of two pickle jars (They were well washed out. Don’t worry!) and poured some dried lentils inside to give the flowers something to stand up in.

IMG_1638

I thought the burlap flowers went nicely with the brown postal twine. There’s also a light dusting of gold glitter on these flowers that the camera didn’t quite pick up. So coordinated!

I placed the large vase in the center of my (smallllll) dining room table flanked by the two smaller jars. If I had a larger table, I would extend this tablescape out by picking up two of these glass taper candleholders from the Dollar Tree (which, side-note: LOTS of people were buying when I was at DT on Saturday. Thanksgiving preparedness, perhaps? Yes, I am a basket peeper.)and this 2-pack of white taper candles. Then I would scootch the little jars down and stick the candles in between. Voila! You could also wrap some fake greenery amongst the five pieces or sprinkle fake leaves.

For my tiny table, however, I’m loving this simple look.

IMG_1646

Do you plan on doing anything special for your Thanksgiving table? Have you ever found great craft supplies from an unlikely place? Would you consider creating a centerpiece like this one? Let me know in the comments below! 


Make a ZERO COST fabric pumpkin in minutes!

fabric pumpkin

Now that we live in Miami, seasons are sort of a thing of the past. When I peak out the window the October sunlight tricks me into thinking it’s gonna be downright balmy outside. No dice! Still in the upper 80’s and humid as heck. While this is certainly a plus for relaxing at the beach when everyone else in the country is bundled into three layers for tailgating, it can be a little difficult to get into the holiday spirit. With Halloween just around the corner, we wanted our apartment to feel appropriately autumnal. (And I really want Trick-or-Treaters to show up at the door!) One fun way of achieving this look ended up being too awesome NOT to share. Mainly because this particular decoration was made from items I had on hand AND took me less than 60 seconds to make. That beats purchasing some cheap, plastic knick-knack I’m gonna have to store OR WORSE…one that ends up in a landfill.

I’ll wager a guess that you have the necessary items to get started! Gather up whatever scarves, dish towels, or fabric you think would make a pretty pumpkin……

…..and a handy roll of good ol’ T.P.

Wrap a scarf or a piece of fabric around a roll of toilet paper to give it a bit more GIRTH.

IMG_1557

Wrap the desired exterior fabric around the roll vertically. If your fabric is quite thin you can thread it through the hole until you’re all the way around. Or, like I’ve done below, you can simply tuck the fabric in section by section on both sides.

IMG_1558

Once all the fabric is tucked and the whole thing is covered, just fluff and fiddle with the folds until you’ve reached your desired effect.

Admittedly, a cool looking stick from your yard would make the BEST stem for your pumpkin. (You could even paint it!) But those type of trees don’t really grow here so I took an alternative route — one that fully embraces my pumpkin’s past life.

IMG_1559

Yes, that’s right…more gifts from the T.P. gods. #TrashToTreasures

Now find a little home for your brand new pumpkin!

IMG_1556

IMG_1549

Make one or a ton. Stack two rolls on top of each other to make a tall pumpkin or add more center fabric to make a fat one! The possibilities are endless!!! And the best part? Once the season is over, you can take your little creations apart, tucking the materials back in their proper place and putting them to new use. Pretty cool!

P.S. I’m also a fan of these foam decorations (packs away flat when stored off-season) and a well-placed window cling for some spookiness. I may have gone a little crazy with the pumpkins. Oh well! *shrugs* One girl’s freshmen year dorm door dec is another girl’s first attempt at a tropical autumn.

halloween decorations collage

DIY: Cork Wreath

trash to treasure

When I was really little I told my parents I wanted to be a recycling woman when I grew up. Now, in my defense, the work I thought was involved in this profession was a lot different than how you may perceive it. I thought recycling people were given trash and then recycled it into items more useful or beautiful. Literally turning things from trash to treasure. My family had a good laugh. I pursued other career options. Life went on. Yet, I’d like to think I held on to a little bit of that childhood initiative. I still feel the need to create something out  of what was otherwise, to someone else, nothing. Maybe that would explain why for months I’d been holding on to a shopping bag full of corks at the back of my closet! An old co-worker’s cast-off…”Will anyone use these for a craft or something?” *raises hand* *ponders how long she’d been adding to this collection, the ol’ Wino!*

The itch to create something from her collection finally struck and I thought I’d show ya how to make your own! I’d eventually like to make a framed cork-board completely out of wine bottle corks but it’s gonna take a lot of nights sipping ol’ faithful (Read: Yellow Tail Chardonnay and whatever’s cheapest Malbec) before we get there. In the meantime…

What you’ll need:

IMG_0933

  • fairly sizable collection of wine bottle corks
  • styrofoam wreath form (You can get these at any craft store but I’ve also seen them for sale at lots of other places, even Dollar Tree.)
  • hot glue gun
  • glue sticks
  • ribbons, fake flowers, buttons, burlap, or anything else you’d like to attach

And how it all comes together:IMG_0939Heat up your glue gun and get to work! There’s no real science here. Just glue the corks down in whatever arrangement you fancy, making sure to leave as little open space as possible for the inside of the wreath to poke through. If there are words, design, or cool details on a cork that you want to display, affix it prominently. This can be a great way to show off a cork that may have sentimental value to you. Think: the bottle you opened on an anniversary or the souvenir wine you brought home from a trip abroad. A few of the corks I used were visibly cracked and I thought that looked cool! If you don’t, hide them near the bottom.

Note: Depending on how your wreath form looks, you may want to wrap it in fabric or burlap before gluing down the corks. Use a long piece of fabric and continuously wrap until you reach the end. Glue the first and last edge down with your hot glue gun.

Once your wreath is completely covered in corks, you may want to add a little embellishment. I dove into my craft box to see what I had on hand and came up with some burlap, ribbon scraps, an old iron on transfer and a star charm. But you can use whatever strikes your fancy!

IMG_0941

Now, hang and enjoy!

Do you like crafting with cast-offs? What’s a collection you have that could be re-purposed into something useful or beautiful? Pinterest awaits you! And speaking of Pinterest–follow me! I’m always pinning the cool up-cycle projects I find.

DIY: Magnet boards.

makeityourself

My sister, Katie, and I did this DIY project a few months back but I thought it was too cute not share with you guys. We thought it was a really adorable way to take something cheap, cookie sheets from Big Lots, and turn it into something beautiful–fabric covered magnet boards. I love how easy this project is to customize. Choose fabrics and details that suit your style and follow a few simple steps…presto, change-o! You’ve got some cool decorative flair for any room. Because we were making our boards as a present for our Mom, we chose a bright, cheery color palette that we knew she would enjoy. Once you’ve got a style and color palette picked out (and some GORGE buttons for magnet-making), it’s time to get started!

What you’ll need:

magnetboard2

-Cheap-o cookie/baking sheet(s)

-Fabric

-Glue gun (mine just happened to match PERFECTLY!)

-Glue sticks

-Magnet dots or magnet tape (you can get the kind with adhesive backing but I would use the glue gun so your decorated magnets hold together a bit better)

-Scissors

-Sewing notions to make magnets–we used a variety of buttons and some golden ribbon

And how it all comes together:

magnetboard3

-Cut your fabric to size and hot glue it to the back of the cookie sheet.

magnetboard4

-Fold edges like a package and trim so they are all even. Cut another piece of fabric to size and glue over the opening–creating a backing. You could do this with a solid more sturdier piece of fabric (maybe even a felt) or stick with the same fabric you used for the front.

magnetboard5

-Once your boards are covered with fabric, it’s time to make magnets! Glue buttons, ribbon, googly eyes, ANYTHING YOU LIKE onto magnets with your hot glue gun. Be sure to press them on hard and let them dry completely.

Magnet inspiration–

magnetboard6 magnetboard7magnetboard8

-For hanging you can get some picture hanging kits from the craft or hardware store to attach to the back or just set ’em on your desk and prop against the wall. Now load your board up with grocery lists, reminders and pics and you’re ready to go!

magnetboard9

Where would you like to hang one of these babies? By your back door? At your office? What colors would you choose? My work just ordered me a new desk (eeps!) so I would love to have one there for a full work-space face-lift. Maybe in some pretty Fall colors to kick off the season! 

DIY: Mason Jar Bath Salts

bathsalts

Ok, I realize the concept of bath salts has been getting a bad rap as of late, ever since weirdos in Florida started smoking them and eating people’s faces off. But ACTUAL bath salts, the kind you soak in, are freaking awesome. Combine the benefits of essential oils with the benefits of salt in your bath water and you have a recipe for mindfulness, muscle recovery, stress relief, improved circulation, and a headache solution. This is a really simple DIY that you can adapt based on your favorite colors, scents, and containers to customize to your liking. Make a huge batch and you’ll have an arsenal of gifts you can break out at a moment’s notice. Not to mention, during the process, your house will smell amazing! I packaged this batch in mason jars because DUH! and I love mason jars (I also wanted to decoupage the tops for some added flair) but I think these, these or these would work well too. You could even be super thrifty and reuse cleaned out food jars.

What you’ll need:

For the salts–

-1 cup of epsom salt

-1 cup of sea salt

-essential oil (I used peppermint and lavender)

-food coloring (I used red and blue)

For the mason jar packaging–

-mason jars with this kind of lid

-magazine cutouts

-decoupaging supplies (I used glue, water and a paintbrush but use Mod Podge if you’re feeling fancy)

-pretty ribbon/s (twine would also look adorably shabby chic)

-a fun charm to tie around the top of the jar

and how it all comes together:

-Mix one cup of epsom salt and one cup of sea salt in a large mixing bowl.

-Add 3-6 drops of food coloring. Mix and add more until you reach your desired hue.

-Add 5-10 drops of your chosen essential oil(s). (You can do a little online research if you’re not familiar with oils and their various benefits.)

-Set the bowl aside and pretty up your mason jar tops by decoupaging a tiny collage on top.

-Spoon your salts into the jars and throw the top on.

-Tie a small charm or gift tag/label around the jar with your chosen ribbon/s.

Voila! You’re well on your way to giving someone the gift of stress relief and a proper pampering.

DIY: Stitch a trip.

map1

Recently, my brother and his girlfriend moved from Danville, KY to Savannah, GA. Lucky lil ducks, I say. I decided to do a little DIY brainstorming for ways to commemorate their big move with a crafty gift. I settled upon a project which ended up being a super easy afternoon endeavor that I’m sure anyone could replicate. Simply hand-stitch a map from point A to point B. Honestly, the toughest part about this craft was finding a suitable map. This would be a great way to remember a meaningful vacation, study-abroad trip or long distance trail hike and would look so sweet hanging amongst other frames on a mixed-media gallery wall.

What you’ll need:

– Map

– Embroidery Thread

– Embroidery Needle

– Frame

And how it all comes together:

– Find a suitable map and cut it to fit your frame. My map was torn from a book of U.S. maps that I found in a discount book bin.

– Sketch out the route and embellishments with a pencil (very lightly). I went with the route, an “X” at point A, a heart at point B and initials.

– Use your needle to poke evenly spaced holes over top of your sketch. Erase any visible pencil marks.

–  Sew through all your holes using a backstitch. (In layman’s terms–Start by threading the needle from the back of the paper through the second hole. Then insert the needle in the first hole and pull through the third. Etc. Clear as mud?)

map2   map3

map4

-Frame and admire your handi-work!

map5


DIY: Baking Soda Face Mask

maskequation

The other day, in a fit of uncharacteristic girliness, I found myself wanting to impulse buy some rather expensive bottle of gobbledy-gook. In this particular instance the gobbledy-gook was exfoliating face mask. Lucky for me, my love of ballin’ on a budget far outweighs my love of beauty products. I had a feeling I could get what I was after with items I already had on hand at home. After a little Google research I came up with a mask that just uses baking soda and water. I’m pretty obsessed with baking soda because it seems to be able to do everything! Check it out–

diymask.jpg

What you’ll need:

– 2 tablespoons of baking soda

– a little bit of room temperature water

– a bowl to mix those 2 things in

– water from the tap to wash the mask off your face

funnyfaces

and how it all comes together:

– Scoop 2 tablespoons of baking soda into a little bowl and add a few drops of water.

– Stir until the two ingredients reach a paste-like consistency.

– Rub this paste mixture all over your face (not in your eyes though, ya dummy) and let it set ’til it dries. It’s fun to make the face pictured below to watch all the cracks happen ~ I’m a child.

maskfun

– Wash the dried mixture off your face with warm water from the tap and gently pat dry.

VOILA! Girliness achieved– but without the crazy chemicals and excess waste that seem to be synonymous with the products marketed at us.

Pro tip: Just go ahead and always have the following things on hand–baking soda, vinegar, witch hazel, Dr. Bronner’s Soap. Hacks galore! ❤ What do ya think? Would you try it?